|
<< Click to Display Table of Contents >> Transcriptions |
  
|
|
<< Click to Display Table of Contents >> Transcriptions |
|
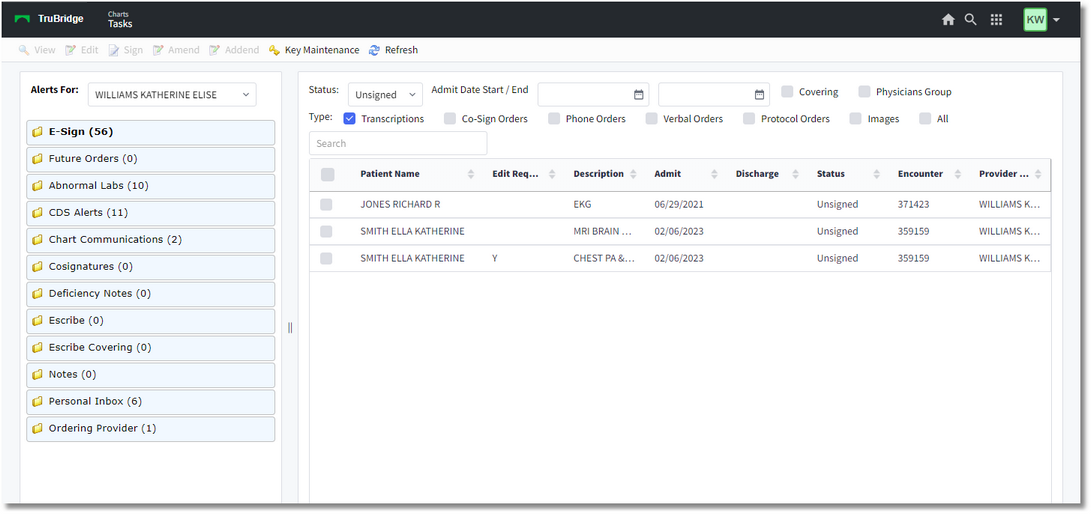
1.To electronically sign a transcription, the physician should leave the Status drop down set as Unsigned. This option lists all unsigned, transcribed Radiology and Medical Record documents for the dictating physician. Selecting the only the Transcriptions check-box will filter the view down to Unsigned Transcriptions.
Select Web Client > Charts > Tasks > E-Sign
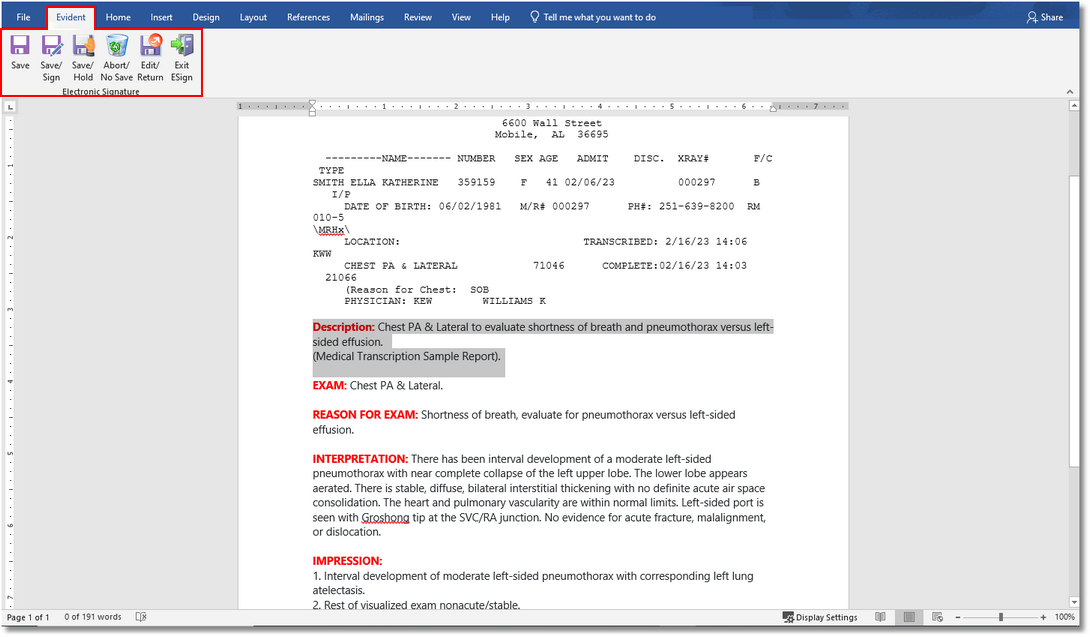
Electronic Signature
2.The initial display will include all unsigned documents as of the current date and time in their most recent version.
•Unsigned transcribed documents that have been flagged for EDIT by the transcribing user will have a "Y" under the Edit Required header.
•The transcribed documents that appear on this screen may be sorted by selecting the headers at the top of the columns.
▪Patient: Displays the Patient Name.
▪Edit Required: Medical Records or Transcribing employee has requested that the provider open and correct/clarify the documentation.
▪Description: The name of the Radiology test or the Medical Records document title.
▪Admit: Displays the patient's admission date from the Registration and ADT screen.
▪Disc: Displays the patient's discharge date from the Registration and ADT screen.
▪Status: This will default to Unsigned, but if the Status dropdown is changed to Signed or All, it will display both previously signed transcriptions as well as Unsigned and Cosign documents from mid-level providers that require a Cosigner.
▪Date/Time: This date will depend on the Description/Status of the Transcription:
•Ancillary Transcription: Date/TIme when the transcription was completed.
•Ancillary Transcription Cosign: Date/Time when the transcription was signed by the midlevel provider.
•Ancillary Transcription Amended/Addended: Date/Time when the transcription was amended or addended.
•Medical Records Transcription: Date/Time when the transcription was completed.
•Medical Records Transcription Cosign: Date/TIme when the transcription was signed by the midlevel provider.
•Medical Records Transcription Amended/Addended: Date/Time when the transcription was amended or addended.
▪Encounter: Displays the patient's account number from the Registration and ADT screen.
▪Provider: The name of the provider who initiated the Phone, Verbal, Protocol, Transcription, as well as any mid-levels that require a cosignature on an order or transcription.
NOTE: Each physician has the option to show consolidated orders so that any consolidated specific procedures will display. This is a setting in the physician security table. If two exams are combined into one transcription, selection of either order will sign, view or edit the original transcribed document.
▪Statuses:
oUnsigned: Unsigned, document is transcribed, but not signed, canceled or discontinued. An Unsigned document may be selected and Edited by the provider while that is the status.
▪Required Edit: Will show as Unsigned, these documents have been flagged for edit by the transcribing user. These documents will have a Y in the Required Edit column.
oSigned: Signed, document is signed, not canceled or discontinued. These will display when Status drop-down is set to All or Signed.
oCosign: This status indicates that the document requires a Cosignature. The provider name that requires the Cosignature along with the transcription will appear in the cosigning physician's queue
oAmended: Amended/Unsigned, previously signed document is amended, but may only be Edited or Signed
oAddended: Addendum/Unsigned, previously signed document has had an addendum, but may only be Edited or Signed.
3.Action bar options are available so that transcriptions may be selected for signing documents. All documents may be selected by selecting the top box next to patient name or individual documents may be selected to sign. To select all the patient documents at once, select the checkbox at the top of the column for transcriptions and then select Edit, Sig, or View, from the action bar. All the transcriptions on the display will be automatically selected to perform the same action. To individually Edit, Sign, or View transcriptions, select the individual checkbox(es) next to the Patient Name. The transcriptions will open up in Microsoft Word with options at the top left of the screen. Edit or View will bring up each transcription in sequence after the previous document has been Signed or Viewed. Selecting Sign will not open the document prior to allowing you to Sign.
Edit
The Edit radio button allows the transcription to be viewed and edited by the signing physician during the Electronic Signature process. If several transcriptions are selected, the system will bring the next transcription in line into view when the previous transcription is closed.
NOTE: Physicians must have security, Authorized to Edit, from Physician Security to be able to edit transcriptions.
If the document was flagged as requiring an edit, the edit instructions entered by the transcribing user will be displayed before the Microsoft® Word software is accessed. Selecting OK will launch Microsoft® Word.
Select Web Client > Charts > Tasks > E-Sign > Select transcription > Select Edit

Message From transcribing user
After the report has been edited/viewed in Microsoft® Word, click on one of the following Electronic Signature toolbar options:
•Save: This will save the document after any changes have been made, but does not sign the document.
•Save/Sign: Saves the changes and prompts for the passphrase. When entered, the transcription is signed.
•Save/Hold: Saves the changes and exits to the Electronic Signature selection screen. This function will leave the transcription in the physician’s queue with a status of unsigned.
•Abort/No Save: Exits to the Electronic Signature selection screen and no changes are saved. A prompt will appear, when selected, to insure that the user does want to exit without saving changes.
•Edit/Return: Presents an edit box to enter edit instructions for the transcribing user and returns the document to the transcribing user.
•Exit ESign: This will not save any changes that have been made to the document and will terminate the batch signing process (if signing transcriptions in a batch). A prompt for exiting without changes will appear to verify whether the user does or does not want to exit.
Editing functions from within Microsoft® Word are still available on the application toolbar, but the Evident option on the toolbar must be selected to have access to the above-listed options.
Select Web Client > Charts > Tasks > E-Sign > Select transcription > Select Edit
E-Sign Transcription Screen
NOTE: Transcriptions against orders that have been returned to the transcribing user may be accessed by selecting the Return for Edit. The option is located on the Ancillary Department Functions menu (Hospital Base Menu-Department Specific-Return for Edit) of the appropriate department or from Medical Records (Hospital Base Menu-Master Selection-Medical Records-Transcribe Orders-Return for Edit). Medical records transcriptions that have been returned to the transcribing user may be accessed by selecting Returned MR ESignature Documents from Medical Records (Hospital Base Menu-Master Selection-Medical Records-Returned MR ESignature Documents).
Select Web Client > Charts > Tasks > E-Sign > Select transcription > Select Edit > Edit transcription > Edit/Return

Edit/Return Message Prompt for Signing Physician
•Exit ESign: Closes the document without electronically signing. When selected, this function will exit the E-Sign Microsoft® Word document, but not before the following message/prompt will display to warn the user that they must select "Save" to save any changes made to the document. If Yes is selected, the document will close. If No is selected, the document will remain open with the edits that were made by the user still intact.
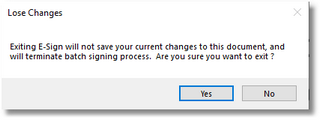
Lose Changes Prompt
Sign
The Sign option allows the signing physician to electronically sign a transcription without reviewing the transcription. Selecting documents to sign before viewing or editing will display " Are you sure that you wish to SIGN this document WITHOUT viewing it?" warning. Select OK to proceed or Cancel to abort the signing option.
NOTE: This feature is controlled by the Warning When Select 'Sign' field on page 1 of the Physician Security table in Tables > Clinical.
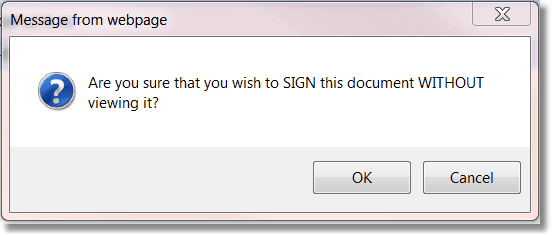
Sign Without Viewing Warning
•If OK is selected then the system will allow signing of the document without viewing.
•Process will have to be selected for signing to be carried out.
•This option will prompt for the pass phrase defined for the signed on physician.
•Enter the pass phrase and select OK or select Cancel.
View
The View option on the Action Bar allows documents to be reviewed and electronically signed. No changes or edits may be made to the document.
•If the document was flagged as requiring an edit following transcription, the document will be highlighted in red. The edit instructions entered by transcribing user will be displayed before Acrobat Reader® software is accessed.
•If the document was not flagged as requiring an edit following transcription, Acrobat Reader® will be accessed and the transcribed report will be displayed.
•The options to Sign, Edit, Return (to transcribing user if previous Edits were made by the user), and Hold (stays unsigned in E-Sign folder) will be available for documents that are in an Unsigned status. Amend and Addend will be available on any documents that have already been signed.
Select Web Client > Charts > Tasks > E-Sign > Select transcription > Select View
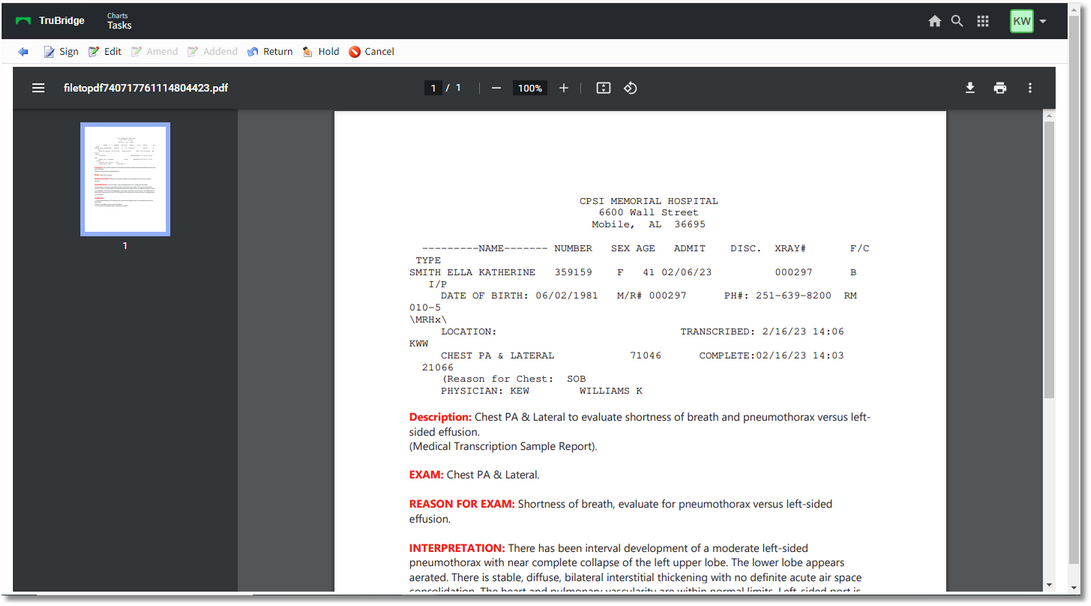
E-Sign View Transcription
After one of the above functions are selected and processed, the system will prompt for the signing physician to enter the Passphrase. Entering the correct Passphrase signs the document and applies any or all of the following data to the transcribed report:
•Signature or Cosignature (DCTNAME) pulling from the Signature field in Physician Security corresponding to the dictating physician initials as defined in Physician Maintenance Table.
•Credentials (RADCRED) from the Credential field in Physician Security corresponding to the dictating physician initials as defined in Physician Maintenance Table.
NOTE: TruBridge recommends placing the physician’s credentials in the Signature field of the Physician Security table page 1. This will allow the credentials to pull with the physician’s name when using the DCTNAME mnemonic. An example would be Daniel E Smith, MD. The Credentials field in the Physician Security table page 1 should be reserved for the physician’s specialty such as Radiologist, Chief of Staff etc.
•Signed date and time (SIGNDATE)
•Result date and time (RSLTDATE), Received date and time (RCVDATE), Collect date and time (COLLDATE), and the Schedule date and time (SCHEDATE) all pulling from Order Entry Maintenance.
•REPDIST which details a list of physicians/locations receiving transcription.
•Sends the report(s) to the designated location(s) defined.
•For transcriptions against orders, it changes the status of the order to SIG-Signed in Order Review and Order Entry Maintenance.
•For transcriptions against orders, it updates Order Entry Maintenance field Signed with the physician initials, date and time.
•For medical record transcriptions, it updates the stats to S - Signed within the Transcription System.
Additional filters are available to expand or narrow the results in the E-Sign folder:
Select Web Client > Charts > Tasks > E-Sign: Transcriptions > Status: All
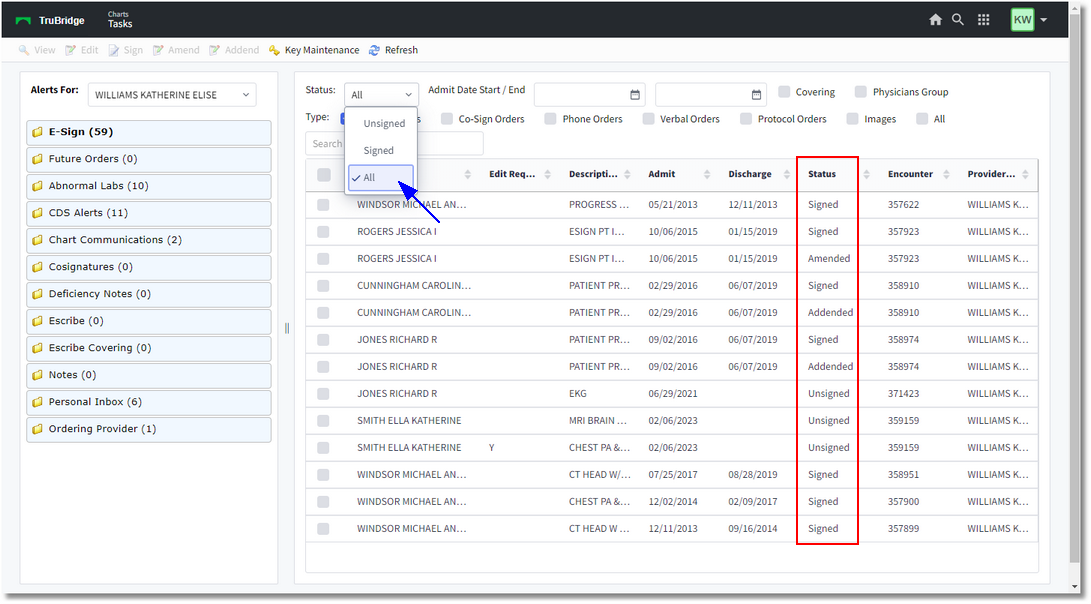
E-Sign Transcription Status
•Status: This drop-down has several options, the default Unsigned, Signed, or All. Selecting Signed will display documents that have been previously signed by the provider. Some functions may be performed on previously-signed documents. Selecting All will display both the Unsigned and Signed transcriptions together. The Status column will show Signed, Unsigned, Amended, Addended, or Cosign transcriptions.
•The options for Amend and Addend will only be selectable on the action bar if the selected document has already been signed.
•Admit Date Start / End: A date range may be entered to search for documents created within the Start and End times entered.
•Covering: If this is selected, the 6-digit physician numbers that are set up in the Tables > Clinical > Physician Security Pg 2 > Authorized To Sign Documents For fields will appear and the name of the physician will be viewable in the Provider column. The document(s) may then be selected and "Signed."
•Physician Group: If this is selected, 3-character Physician Group code that is entered in the Tables > Clinical > Physician Security Pg 2 > Chartlink Group Code (and Sub Groups) will display any Providers that are set up in a Chartlink/Physician Group with the user. The Chartlink Group Code is set up in the CL Table availables from System Menu > Master Selection > Business Office Tables > Business Office Table Maintenance > CL Tables > Chartlink Groups.