|
<< Click to Display Table of Contents >> Collection Letters |
  
|
|
<< Click to Display Table of Contents >> Collection Letters |
|
The system will generate two collection letters for A/R accounts based on the aging status of the account: one is produced when the account is at collect code 3 and another at collect code A, at the time the file build is done. The printing of the collection letters will also advance these account’s collect codes from 3 to A, and from A to B. These letters are to be printed on a weekly basis after statements, using the same weekly cycle code. The form letters are set up in a word processing library "/usr/wplib" under the document names "COLLECT-L1" and "COLLECT-L2". They are initially set up by TruBridge, but the phrasing may be changed at any time (call TruBridge for assistance). Once they are created, they do not have to be accessed again unless changes are required.
NOTE: Facilities with more than one company sharing the same server must set up collection letters in separate libraries. The documents COLLECT-L1 and COLLECT-L2 will remain in /usr/wplib for the main company, but will also need to be set up in /usr/wplib/02 for company 02, /usr/wplib/03 for company 03, and so forth. This will allow facilities to have separate letters with different information for each of their companies.
NOTE: A note will be placed on the Account Detail when a collection letter is printed. The line of detail will include the AR date and "LETTER-L1" or "LETTER-L2" with the as of date of the file build. It will also include the cycle code for which the letter was printed, as well as the collect code the account was moved.
How to Print
| 1. | Select Print Reports from the Hospital Base Menu or the Master Selection screen. |
| 2. | Select Accounts Receivable. |
| 3. | Select Collection Letters. |
| 4. | Select a print option. |
The system will display the library and file name of the two letters that will be printed: "/usr/wplib/COLLECT-L1" and "/usr/wplib/COLLECT-L2". These represent Collection Letters 1 and 2.
| • | No response is needed, press Enter to continue. |
System prompts, "As Of Date:"
| • | The as of date should be the date that was used to build the A/R File for printing statements because any receipts or adjustments that were posted after that date will not be reflected in the account balance. The system will default to the file build date. Press Enter to continue. |
System prompts, "Cycle Code (“A"ll):"
| • | Enter the cycle code that was used to print statements. |
System prompts, “Sort by Zip Code? (“Y”es or “N”o):"
| • | Enter Y to sort and print letters in Zip Code order. Enter N to sort and print letters in alphabetical order. |
System prompts, "Is This a Restart? (0-Exit “Y”es or “N”o):"
| • | Answer N if printing letters for the first time. If the printer jammed (or stopped) when the letters were partially printed, enter, Y and the system will prompt for a starting account number (the account number of the last statement that printed successfully). Enter 0 to exit without printing letters. |
When all collection letters have completed printing for the current cycle, the system will print a listing of totals:
125 COLLECT-L1 Letters Printed $60,830.57
200 COLLECT-L2 Letters Printed $99,897.74
325 Total Letters Printed $160,728.31
Collection Letter
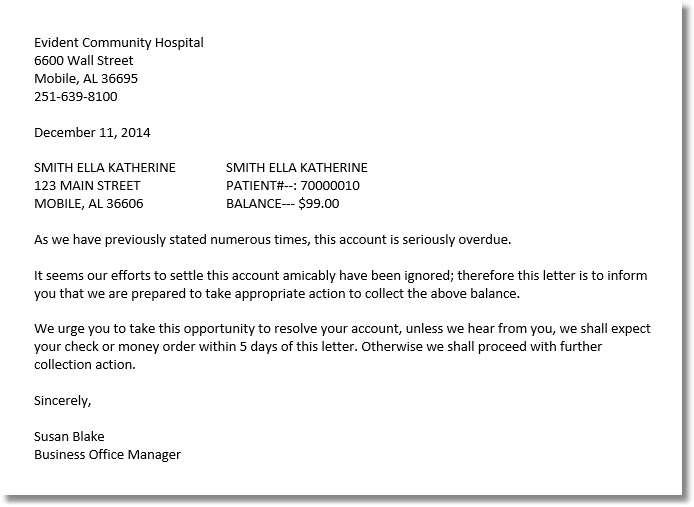
Listed below is an explanation of each column.
| • | Company Information: The hospital name, mailing address and telephone number pulling from the form letter set up in /usr/wplib word processing library. |
| • | Date: The "as of date" entered when running the Collection Letters. |
| • | Name & Address: The guarantor's Name and Address pulls from the Guarantor/Ins tab on the Registration and ADT screen. |
| • | Patient Information: The patient's name, account number, account balance, discharge date and Stay Type pulls from Patient Maintenance and patient's account detail. |
| • | Text of Letter: The Text of the Collection Letter previously set up in the word processing library, "/usr/wplib" as "COLLECT-L1” or “COLLECT-L2." |