|
<< Click to Display Table of Contents >> AP Control Record - Checks |
  
|
|
<< Click to Display Table of Contents >> AP Control Record - Checks |
  
|
Select Web Client > System Menu > Accounts Payable > Control Options > Checks

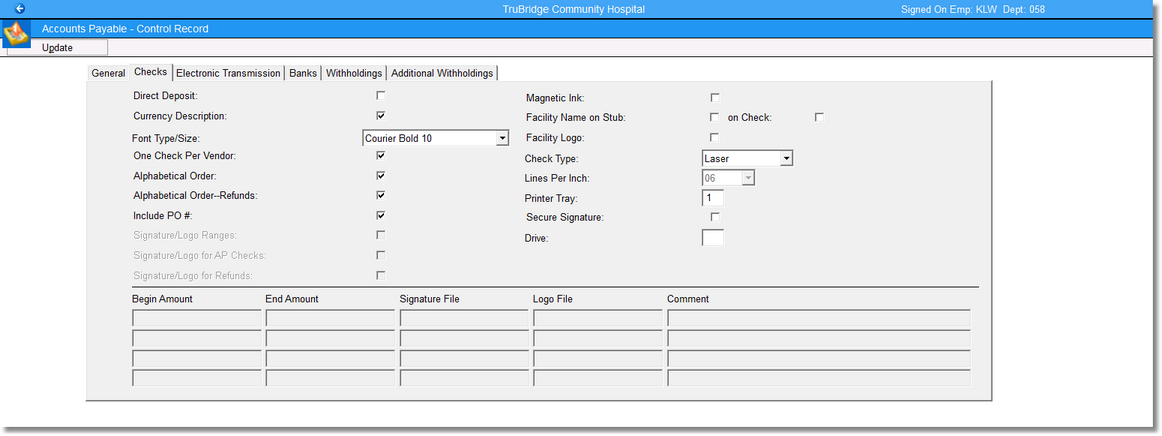
Accounts Payable - Control Record, Checks
•Direct Deposit: Selecting this field will allow Direct Deposit of AP checks to be used. Contact a TruBridge Marketing Representative for further information.
•Currency Description: Selecting this field will cause the description portion of the check to be printed using words only, excluding any numerals.
•Font Type/Size: Select the drop-down to select the font type and size to print on the check. The options are as follows:
▪Arial 12
▪Courier 12
▪Courier Bold 10
▪Courier New 12
▪Helvetica Bold 8
NOTE: The font type and sizes will only work for Laser Checks. Facilities using Secure Signature will need to contact a TruBridge Support Representative if wanting to change the font size programmed on the Secure Signature card.
•One Check Per Vendor: This field controls the number of checks that a vendor will receive when the number of invoices being paid exceeds the maximum for one check stub. Each check allows a maximum of 15 invoices to print on the stub portion of the check.
If selected, the system will print 15 invoices on the stub, print “Continued” at the bottom of the stub, void the check portion of the check, and continue to print a second check. The second check will have any additional invoices, up to 15, and will then print a check for the total of all invoices on both stubs. The stub portion of the first check will be sent along with the second check to the vendor.
If left blank, the system will print 15 invoices on each check and total each check separately. Using this method of mailing multiple checks to a vendor will alleviate the need to account for any voided checks.
If the option is chosen during the check run to print each invoice’s AP Memo below its accompanying invoice number on the check stub, then the check stub will list up to eight invoices and memos. The remaining invoice/memos will print on following check stubs.
•Alphabetical Order: If selected, the vendor checks will print in alphabetical order by vendor name. If left blank, the checks will print in vendor number order.
•Alphabetical Order--Refunds: If selected, refund checks will print in alphabetical order by payee. If left blank, the checks will print in refund number order.
•Include PO #: If selected, the purchase order number will print on the vendors’ checks after the AP Memo. If left blank, no purchase order information will print on the checks.
•Signature/Logo Ranges: This field is used in conjunction with Secure Check Signature and allows the ability to set limits and ranges on how many signatures will print on the check. Enter the Begin Amount and End Amount for each range. The system will look to the Signature File for how many signatures to print on the checks. The Comment field is informational only and shows how many signatures are required for that range.
•Signature/Logo for AP Checks: If both the Secure Signature and Signature/Logo Ranges fields are selected, this field will be available for selection as well. If selected, this field will allow the signature/logo ranges listed at the bottom of the screen to apply to all AP checks. This will include Special Checks.
•Signature/Logo for Refunds: If both the Secure Signature and Signature/Logo Ranges fields are selected, this field will be available for selection as well. If selected, this field will allow the signature/logo ranges listed at the bottom of the screen to apply to Refund checks issued through AP.
•Magnetic Ink: This field is used in conjunction with Secure Check Signature. Select this field if the Bank Account and Routing Number should print using the magnetic ink cartridge.
•Facility Name on Stub: on Check: There are two parts to this field. When the first field is selected, the facility name will print on the check stub for Direct Deposit. When the second part is selected, the facility name will print on the check.
•Facility Logo: This field is used in conjunction with Secure Check Signature. If selected, the facility’s logo will print on the check.
•Check Type: Using the drop-down box select either Pin-Fed, Laser or Sealed as the type of checks being printed.
•Lines Per Inch: If Pin-Fed checks are being used this field will be accessible. Using the drop-down box, select either 06 or 08 lines per inch. Selecting either quantity of lines per inch will cause the font of the vendors’ addresses to be smaller making it possible to print longer addresses.
•Printer Tray: If a facility is utilizing laser checks printed on a multi-tray laser printer, enter the tray number for printing checks.
•Secure Signature: If a facility is utilizing Secure Check Signature for Accounts Payable checks, this field should be selected.
•Drive: This field is used in conjunction with Secure Check Signature. The drive the Secure Signature card is plugged into should be entered in this field.
•Update: This option is on the toolbar at the top left of the page. Select Update to retain any changes made in Control Options. If this option is not selected prior to exiting the screen, any changes will not be saved.