|
<< Click to Display Table of Contents >> Entering Invoices |
  
|
|
<< Click to Display Table of Contents >> Entering Invoices |
|
Select New Invoices from the Accounts Payable Main Menu. The following will display.
Select Web Client > System Menu > Accounts Payable > New Invoices
Accounts Payable
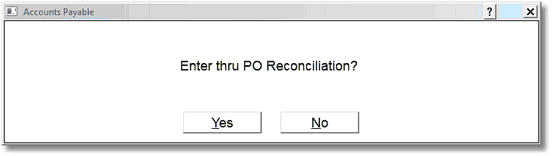
If the invoices entered will be entered using the AP/MM interface, select Yes. For further information on the AP/MM interface see Integrating Account Payable with Materials Management section of this User Guide. If the invoices will not be entered using the AP/MM interface, select No and the following screen will be displayed.
Select Web Client > System Menu > Accounts Payable > New Invoices > No
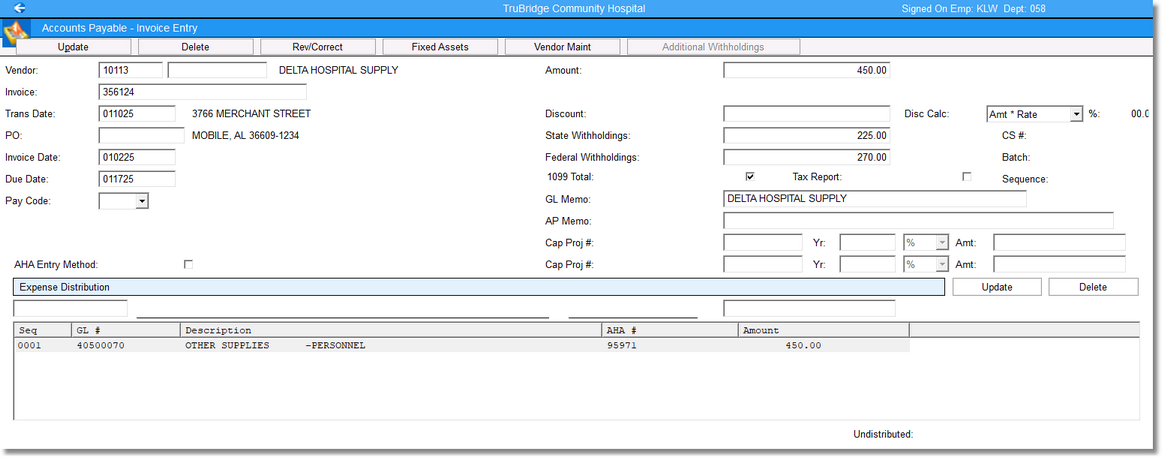
Accounts Payable - Invoice Entry
NOTE: Entering the Tab key will advance to the next field. Entering a Shift Tab will go back to the previous field.
•Vendor: Enter the five-digit Vendor Number assigned to each specific vendor. Entering a ? will provide a lookup showing a listing of vendors and vendor numbers. Select the name of the desired vendor.
•Invoice: Enter the invoice number as it appears on the invoice. This may be up to 16 characters. However, in order to use the automated Credit Memo option, the Invoice Number should not exceed 14 characters. The field will accept alpha, numeric or an alpha/numeric combination of characters. The system will not allow duplicate invoice numbers to be entered for a vendor. If the invoice does not have a number, the month and year may be entered in place of an invoice number.
NOTE: When a Credit Memo should be applied against the original invoice, the invoice number of the Credit Memo should begin with CM followed by the original invoice number. For example, if the original invoice number was 12345, the Credit Memo number should be CM12345.
•Trans Date: The Transaction Date is the date the invoice will affect General Ledger and is normally the current date. However, there are occasions where transactions may need to be backdated or future-dated. When backdating, no date prior to the Trial Balance/Closed Date in the Accounts Payable Control Record may be entered. To enter a future date, type FUTURE in the Transaction Date field, and then a future date may be entered. Invoices with different Transaction Dates may be entered in a single session.
•PO: Enter the Purchase Order number associated with this invoice, if applicable.
•Invoice Date: The invoice date is entered in MMDDYY sequence. The system utilizes this date to print in Invoice Date Sequence for several reporting options.
•Due Date: The system will automatically compute the Due Date from the invoice date based on the number of days loaded in the Vendor Master, Due Date Fwd field on page 3. Otherwise, the Due Date should be entered in MMDDYY sequence. The system will use this date in three ways: First, checks may be printed for vendors based on the Due Date that has been entered on invoices. Second, the system will refer to the Due Date when trying to determine if a discount is to be taken on an invoice. Third, an invoice aging report may be printed based on the Due Date.
•Pay Code: The Pay Code field is used during invoice entry to prevent an invoice from being paid on its Due Date. By placing an N in this field, the system will ignore the invoice when checks are printed. This field should be left blank if not entering a Pay Code of N.
NOTE: After the invoice has been moved to permanent file the Pay Code of Multi-Pay may be selected.
•AHA Entry Method: This field will default to selected if the AP Control Record is set to use AHA General Ledger numbers for new invoices. When selected and using the lookup option for the Expense Distribution, the search will look for AHA General Ledger numbers. If left blank, the system will search for General Ledger numbers set up in the Chart of Accounts. This field may be selected or unselected at any time during new invoice entry.
•Amount: The invoice amount must be the gross amount for the entire invoice.
NOTE: If the vendor is set up to have Additional Withholdings and the withholding total amount exceeds the invoice amount, a warning will display once an amount has been entered.
•Discount: If a discount percentage has been entered in the Vendor Master, the system will automatically compute the anticipated amount of the discount at the time the invoice is entered. This discount amount may be over-keyed.
•Disc Calc: The Discount Calculation option provides four ways to calculate a discount amount. Selecting % of Amt will use the amount entered in the Discount field as a percentage in the calculation. The percentage entered will be multiplied by the invoice total to get the discount amount. For instance, if 10.00 is entered and the invoice amount is 250.00, then the system will calculate a discount of 25.00. If Amt * Rate is selected, the amount entered in the Discount field will be the dollar amount of the discount. If Disc * Rate is entered, the system will use the figure entered as the percent of the original discount to use as the final discount. For example, if the discount entered in the Vendor Master is 10% and the invoice amount is 250.00, if 50 is loaded in this field, then the final discount will be 5.00 (which is 10% of 50.00).
•State Withholdings: If the vendor has State Withholdings, the system will calculate the withholding amount and display it in this field. The withholding amount will be calculated by looking at the State Tax Percentage in Control Options and the amount of the invoice. The State Flat Rate in Vendor Maintenance will also be taken into account, if applicable. This field may be manually updated if needed.
•Federal Withholdings: If the vendor has Federal Withholdings, the system will calculate the withholding amount and display it in this field. The withholding amount will be calculated by looking at the Federal Withholding Rate in Control Options and the amount of the invoice. The Federal Flat Rate in Vendor Maintenance will also be taken into account, if applicable. This field may be manually updated if needed.
NOTE: Discounts, State and Federal Withholdings and Additional Withholdings will not display on the Transaction Edit List as a GL Transaction, but will rather display at the bottom of the Transaction Edit List. State and Federal Withholdings will display on the check stub when printing the Check Edit Run and when printing checks.
•1099 Total: If the 1099 Vendor field in Vendor Master is selected, this field will be selected by default. However, if the amount on this invoice should not be included in the end of year 1099 total, the field may be unselected. If the field is unselected and the amount on this invoice should be included in the end of year 1099 total, the field may be selected.
•Tax Report: When entering invoices, the Tax Report field will default to blank. If selected, the invoice will pull to the Sales and Use Tax Report. This report identifies, by invoice, if an expense is taxable or nontaxable. This field may not be changed after an invoice has been moved to permanent file.
•GL Memo: The GL Memo line on an invoice will default to the name of the vendor when the invoice is entered. This will appear in the General Ledger Account Detail for the account that the invoice is expensed against. This line may be over-keyed with any comment desired.
•AP Memo: The AP Memo line will not pull to General Ledger but can be included on the check stub during the check printing process. This line can be changed in Invoice Review and Correct and will then pull to the permanent invoice file. It may be accessed and manipulated in Existing Invoices.
•Cap Project # Year Amount: The Capital Project # from the General Ledger application should be loaded in this field if this invoice should subtract from the project's budget. If more than one project is added to an invoice, then the invoice would need to indicate via the % or $ fields what portion of the invoice amount applies to that project. If only one project is added to an invoice then the % and $ fields would not need to be completed and would default to 100% of the invoice amount.
NOTE: If the Capital Project # is loaded on the Vendor Maintenance, it will not be necessary to load the project number on the invoice.
After the top portion of the Invoice Entry screen has been completed, the invoice should be expensed.
•GL Number: Enter or select a valid General Ledger number to which this invoice will be expensed. The system will not accept an account number that is marked as inactive in the Chart of Accounts. If the exact General Ledger number is not known, entering a ? will display the General Ledger account lookup.
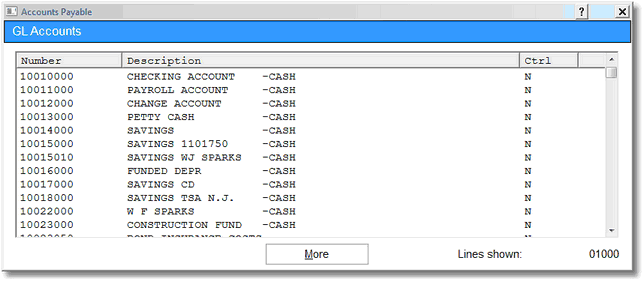
GL Accounts
After selecting a valid General Ledger number, enter the amount that is to be distributed to the General Ledger account number entered on this line then select Update next to the expensed amount. The system will allow for distribution to multiple General Ledger accounts for one invoice. All distributions that include a negative entry (Credit Memos, etc.) should be entered with a - (minus sign).
The system will automatically display the General Ledger account description and any associated A.H.A. number in the next two fields.
•Undistributed: Below the Expense Distribution section, the system will display the balance not yet distributed. The entire invoice amount should be distributed before selecting Update for the invoice. If Update, at the top of the screen, is selected and the entire amount has not been distributed, the system will flag, “The total invoice amt not distributed.”
The following options are located on the tool bar at the top left of the screen:
•Update: After the entire amount has been distributed to General Ledger numbers, select Update.
•Delete: This option will delete the invoice.
•Rev/Correct: This option will display a list of the invoices currently entered but not yet posted. Selecting an invoice from this listing will place the invoice back into the Invoice Entry Screen to allow for any corrections to be made prior to posting the invoice to the permanent file. After entering any changes, Update must be selected to save the changes.
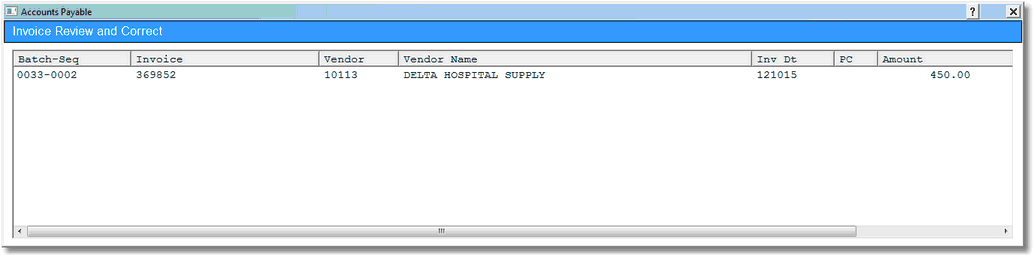
Invoice Review and Correct
•Fixed Assets: This option is a link into the Fixed Assets application. This will enable a new asset to be entered during invoice entry.
•Vendor Maint: This option will allow a new vendor to be entered during invoice entry. If a vendor has already been selected, choosing this option will allow access to that vendor's maintenance screens.
•Additional Withholdings: This option will only be enabled once an amount has been entered for the invoice and the vendor has Additional Withholdings set up in the Vendor Master. Once this option is selected, a screen will display with the Additional Withholdings Code and the vendor amount that was loaded in the Vendor Master. This amount may be changed if needed in the Amount field. If the amount is changed, select the Save icon to save changes.
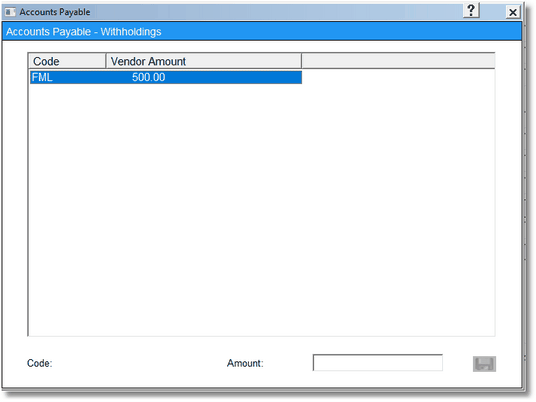
Accounts Payable - Withholdings
NOTE: Additional Withholdings will display on the check stub when printing the Check Edit Run and when printing checks.
Once all changes have been made, the Transaction Edit List should be printed and the prompt to move to permanent file answered Y. The invoices will then be removed from the Invoice Review and Correct screen and posted to the vendor accounts.