|
<< Click to Display Table of Contents >> Generating A Patient Refund |
  
|
|
<< Click to Display Table of Contents >> Generating A Patient Refund |
|
There are five main steps when generating a patient refund:
1. Enter the refund information into the Refund Entry and Review screen.
2. Print the Refund Edit List.
3. Print the refund check(s).
4. Print and post the Transaction Edit List.
5. Post the refund charge against the patient’s account in Accounts Receivable.
Select Web Client > System Menu > Accounts Payable > Refunds
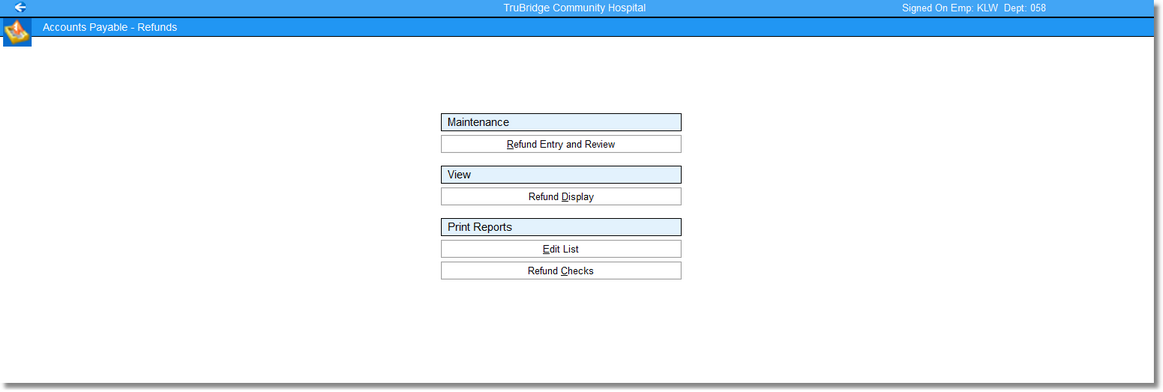
Accounts Payable - Refunds
•After accessing Refund Entry and Review, the system will prompt for the “As-of Date”. This refers to the date refunds are entered into the Refund system. This is not the date refunds will post to the patient’s account. The system will post the refunds to the patient’s account based on the check date only. However, the system will not print a refund check where the check date is earlier than the “As-of Date.” The “As-of Date” allows the continuous set up of refunds but still controls the payment date without having to use the N Pay Code. The As-of Date will default to the current date but this may be over-keyed.
Select Web Client > System Menu > Accounts Payable > Refunds > Refund Entry and Review
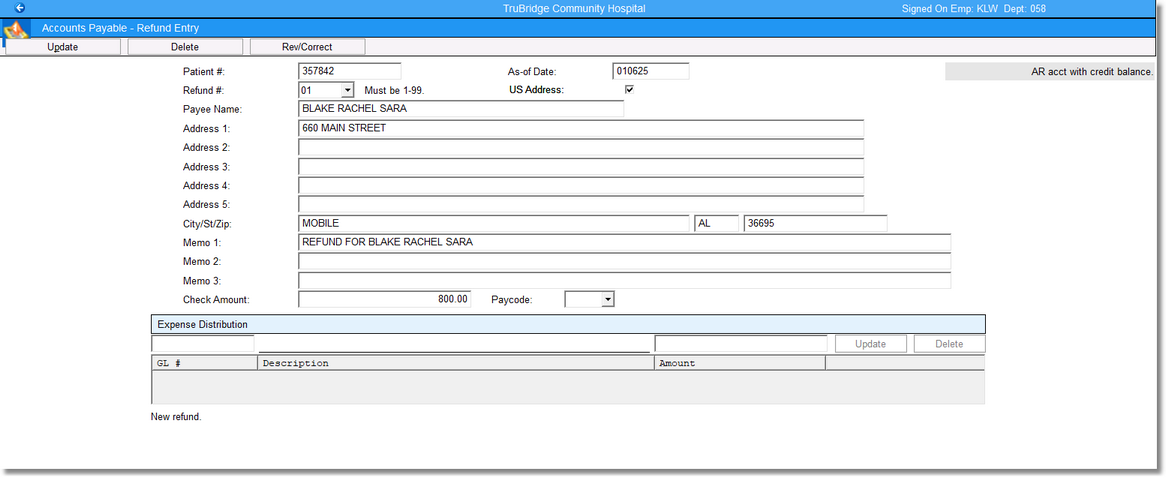
Accounts Payable - Refund Entry
•Patient #: Enter the number of the account for which the refund will be deducted.
•Refund #: Using the drop-down box provided, select the number of refunds being entered. If more than one check is to be generated in a day, enter a 2, enter 3 if three checks will be issued, etc.
•US Address: This field defaults as selected. If this field is not selected, the system will display five free-form text lines for a foreign address, the City/State/Zip field will not be available. Both U.S. and foreign address may be entered for a refund. The status of this option determines which address will print on the check.
•Payee Name: By default, the system will complete the Payee Name as the Guarantor Name from the patient’s account information on the Guarantor/Ins tab on the Registration and ADT screen. The Payee's Name may be over-keyed at this time if the refund is not to be paid to the guarantor.
•Address Information: The system will pull the guarantor address from the patient’s account information on the Guarantor/Ins tab on the Registration and ADT screen. The address information may be over-keyed at this time if the refund is not to be paid to the guarantor.
•Memo Lines: Memo Line 1 will automatically be completed with a note stating “Refund For” and the patient’s name. This message may be over-keyed or additional information may be added in Memo Lines 2 and 3.
•Check Amt: The system will automatically enter the credit balance from the patient’s account in this field. This balance amount will be the amount of the refund check. This amount may be over-keyed if necessary. Occasionally, there may be a need to write a refund check for an account that does not have a credit balance. When this occurs, the system will warn that the account does not have a credit balance by displaying a message "AR account with a debit balance.” in the upper left corner of the screen and it will not place an amount in the balance field. It will, however, allow an amount to be entered.
•Pay Code: The Pay Code in the Refund application works exactly like Pay Codes in Accounts Payable. If the Pay Code field is left blank, the system will print a check in the check run. If the refund is entered but a refund check should not be issued at this time. A Pay Code of N (No Pay) may be entered. The N Pay Code will need to be removed before a check will print. A Pay Code of P (Paid) will automatically be placed in the Pay Code field when the system prints a check.
Some paid checks will have a Pay Code of X. The Refund application purges refund checks by changing Pay Codes. After a check has been issued, then the next time refund checks are printed, it will automatically change all refund checks with a Pay Code of P to a Pay Code of X and will simultaneously purge all checks that previously had a Pay Code of X.
The following are options located on the toolbar at the top left of the screen.
•Update: After entering a refund, Update will need to be selected before exiting the screen to retain the information entered.
•Delete: Select this option to delete an existing account prior to printing a refund check.
•Rev/Correct: Selecting this option will display all the refunds entered. These refunds have not been moved to permanent file and checks have not been printed. Click on a displayed account to make any necessary changes prior to printing a check for the invoice.
NOTE: Patient refunds may also be initiated via Accounts Management. Please refer to the Accounts Management section of the Collections User Guide for more information on this feature.