|
<< Click to Display Table of Contents >> Assign Document Type |
  
|
|
<< Click to Display Table of Contents >> Assign Document Type |
|
If the ![]() barcode icon was not used before scanning, the images may be manually placed in the document type folders by selecting the
barcode icon was not used before scanning, the images may be manually placed in the document type folders by selecting the ![]() Assign Document Type icon. Once Assign Document Type is selected this screen below will appear:
Assign Document Type icon. Once Assign Document Type is selected this screen below will appear:
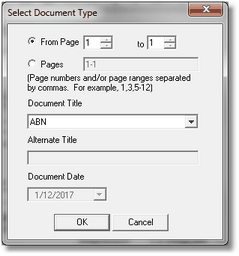
Select Document Type
•From Page: This will allow pages to be selected for this document type.
•Pages: This will allow page numbers or a range of pages to be selected for this document type.
•Document Title: Select the Document Title for the pages selected. This table pulls from the Image Title table in Table Maintenance.
•Alternate Title: Enter the Alternate Title for this document. This option will be available if "Alternate Title Prompt" is selected in the Image Title table in Table Maintenance.
•Document Date: Select the document date to be used for this Document Title. The default will be the current date. This option will be available if "Enter Document Date" is selected in the Image Title table in Table Maintenance. The date entered will display next to the Image Title on the patient’s account.
Select Ok to save the selected information or Cancel to not save document type information.
If the Batch Scanning application is exited without the images placed in a document folder, this screen will appear.
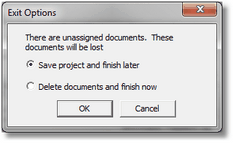
Exit Options
•Save project and finish later: Select this field to keep the project in the Batch Scanning application. This option could be used to save changes and allow them to be edited and finished at a later date.
•Delete documents and finish now: Select this field to delete the batch. This option could be used if the batch was no longer needed or needs to be scanned/uploaded at a later date.
If Save project and finish later is selected the following screen will appear when re-entering Batch Scanning.
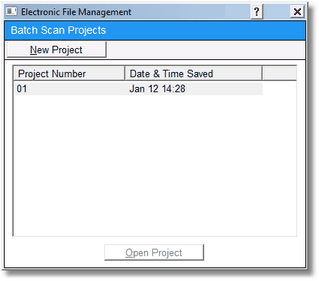
Batch Scan Projects
For new images being entered into the system select New Project. To edit an existing image highlight the desired Project Number then select Open Project to view image. This will allow the image to be further edited and/or moved into the selected document folders.
Once the images are saved and moved into the desired document folders, the images will no longer appear in batch scanning. The images will then be moved into the Electronic File Management application.