|
<< Click to Display Table of Contents >> General Control Table |
  
|
|
<< Click to Display Table of Contents >> General Control Table |
|
The General Control table is where the messages may be set for all places being scheduled. This table may be accessed within Patient Intake Table Maintenance. Select General Control and then select Messages on the action bar to access the messages.
NOTE: Access will need to be given to the Message Configuration Behavior Control to have access to this screen.
Select Web Client > Tables > Patient Intake > General Control

General Control Table
Editing a Message
To customize a message, select the message and then select Edit.
NOTE: Users will need to be given access to the Allow Editing Messages Behavior Control to be able to edit appointment messages. Without this behavior control, messages will be read only, and no changes will be allowed.
Select Web Client > Tables > Patient Intake > General Control > Messages

General Control - Messages
The Global Settings for the selected message will appear.
Select Web Client > Tables > Patient Intake > General Control > Messages > Select a Message > Edit
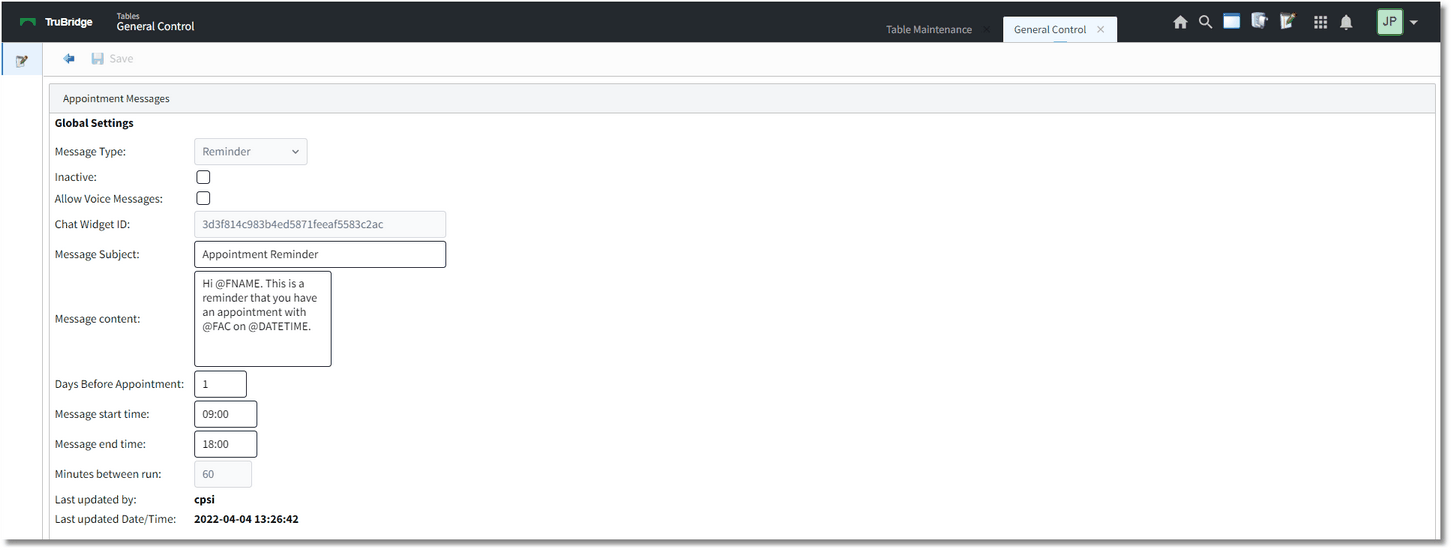
General Control - Messages Edit
Below is an explanation of each field.
•Message Type: Displays Confirmation, Reminder or Affirmation, depending on which message was selected.
•Inactive: Determines if the facility is sending the selected message. The default for this field will be unchecked.
•Allow Voice Messages: Select this option to enable voice messages and allow an auto call to be made to patients for appointment reminders if the patient has opted in for voice messages. This field will only display for Reminder messages.
•Chat Widget ID: For TruBridge use only.
•Message Subject: The subject to display in the email when it is sent to patients. There are mnemonics that may be used to automatically pull information in to the message:
▪@FNAME: This will pull the patient's name to the message.
▪@FAC: This will pull the name of the facility to the message.
▪@MODAYR: This will pull the US date format (Month, Day, Year) of the appointment to the message.
▪@DAMOYR: This will pull the international date format (Day, Month, Year) of the appointment to the message.
▪@HHMM: This will pull the time of the appointment to the message. The format will be HH:MM followed by AM or PM.
▪@EVENTPHY: This will pull the provider from the physician field on the Event screen of the appointment to the message.
•Message Content: The message the patient will get for the selected message.
•Days Before Appointment: The number of days before the appointment to send the message. This field will not display for Affirmation messages.
•Message Start Time: The time of day to begin sending the message.
•Message End Time: The time of day to stop sending the message.
•Minutes Between Run: The number of minutes between sending out messages.
NOTE: Appointment Reminder message will contain the text "<<No Reply>>" at the end to notify recipients that the mailbox messages are not monitored.
Mass Change Messages
The Mass Change option makes it easy to see where patient messages are coming from and displays a preview of what will be sent, based on the task and resource selected. It allows facilities to set messages to active or inactive for multiple resources (i.e., by Location/Personnel) and/or tasks. It also allows messages to be edited and/or deleted.
This tool is especially useful for confirming messages are set up as expected, ensuring the content sent to patients works as expected. It eliminates the need to create test appointments or wait for scheduled timeframes to confirm emails or text messages are set up correctly.
Select Web Client > Tables > Patient Intake > General Control > Messages > Mass Change

General Control - Messages - Mass Change
A listing of all tasks and resources from the Tasks/Procedures, Locations and Personnel tables will then be displayed in alphabetical order. The columns of information are as follows:
•Type: The table where the message is set up.
•Description: The description of the Task, Task/Resource, Location or Personnel.
NOTE: For Task/Resource types, the information before the hyphen ( - ) is the description of the task and the information after the hyphen ( - ) is the description of the task resource the message was set up for.
•Affirmation/Confirmation/Reminder: Will display the message status for the listed tasks and resources. The message statuses are as follows:
▪Active: The message type is set to active in the corresponding table.
▪Inactive: The message type is set to inactive in the corresponding table.
▪No Message Content: There isn’t any message content for the listed task and/or resource. However, a message can still be sent to the patient depending on the hierarchy of where the message is set up.
NOTE: The screen will default to Affirmation but selecting the Message Type drop-down at the top of the screen will allow the listing to be changed to Confirmation or Reminder.
•Task And Resource Active: Will display whether the task or resource is set to Active or Inactive in their respective tables.
Select the All drop-down to delimit the listing to only display Task Resources Only, Tasks Only, Resources Only, Locations Only or Personnel Only.
Additional parameters are available at the top of the screen to narrow down the listing.
•Message Type: Select the type of message to display: Affirmation, Confirmation or Reminder. This field will default to Affirmation.
•Message Status: Select the status of the message to display: Active, Inactive or No Message Content. This field will default to All.
•Task And Resource Status: Select Active or Inactive to only display Tasks and Resources that are active/inactive. This field will default to Both.
•Specialty Task Type: Select Standard, Group or OR Procedures to only display tasks designated as one of those specialty types. This field will default to All.
•Category: Select a specific category to view all tasks assigned to it.
•Search: This option may be used to search by the description of the task or resource.
Message Preview
Select one task or resource from the listing to display the Message Preview.
Select Web Client > Tables > Patient Intake > General Control > Messages > Mass Change > Select Type
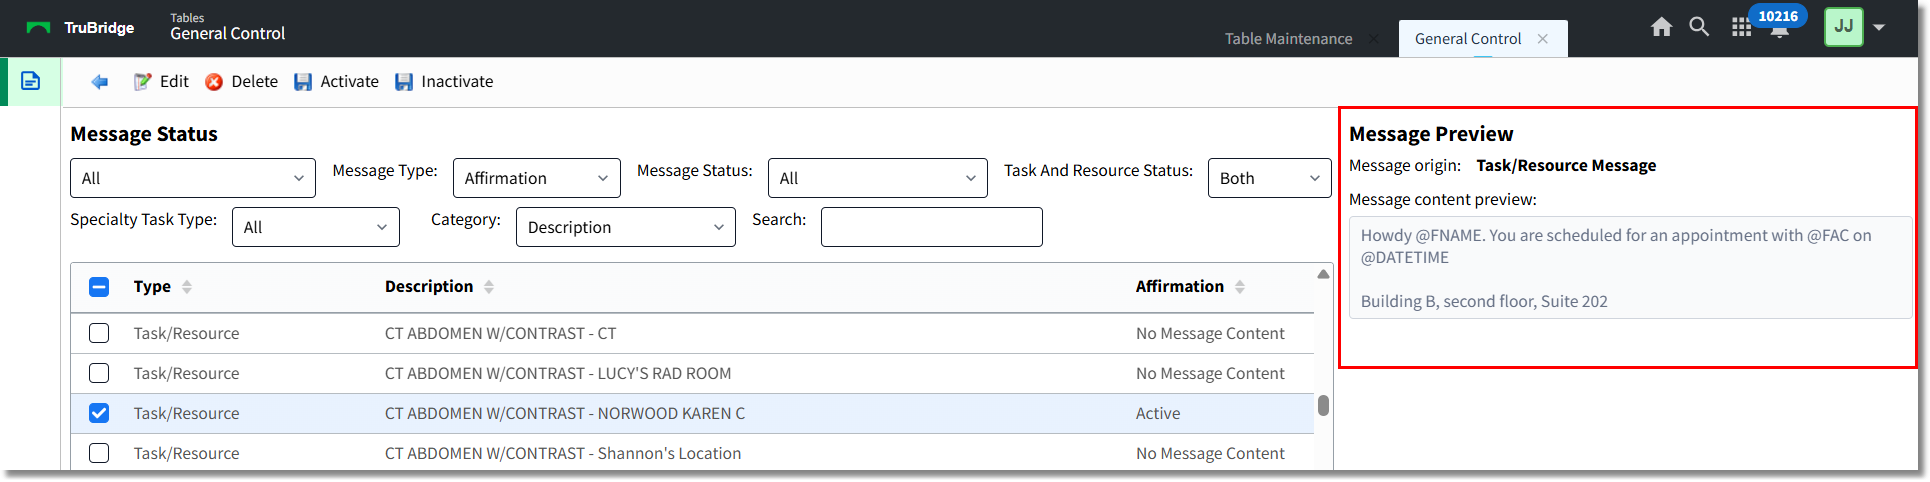
General Control - Messages - Mass Change
The Message Preview will display the Message Origin and the Message Content. The Message Origin displays which table the message is pulling from.
There is a hierarchy of where the messages will pull from. TruBridge EHR will first look to the Task Resource to see if there is any message content. If there isn't then it will look to see if there is a message for the task. If there isn't then it will look to the resource (i.e., Location, Personnel) for the message. Then the last place the system will look is the Message Global Settings. It is important to note that if any of the resource message types are set to inactive, the system will look no further and that message type will not be sent to the patient.
The options that may display for the Message Origin are as follows:
•Global Message: The message is pulled from Message Global Settings in the General Control table. This means that a message has not been designated within the Tasks/Procedures table for the task or resource or the Locations or Personnel tables.
•Resource Message: The message is pulled from the Locations or Personnel table.
•Task Message: The message is pulling from the Tasks/Procedures table for the task.
•Task/Resource Message: The message is pulling from the Task Resource within the Tasks/Procedures table.
NOTE: When more than one task and/or resource is selected, nothing will be displayed in the Message Preview.
When a task or resource is selected and the message status is No Message Content, a message may still be sent to a patient. For example, if there is a task with an affirmation message but none of the task resources have customized affirmation messages, then the task affirmation message will be sent to the patient. Or, if there isn’t an affirmation message set up for the task or the task resource, but there is one set up for the resource, then the resource affirmation message will be sent.
When tasks are selected, the following options will also be enabled on the action bar:
•Edit: This will be enabled when only one task or resource has been selected. Selecting this option will allow the Message Content to be added/updated without having to go to the specific table to make changes.
NOTE: When multiple tasks and/or resources are selected, the Edit option will not be enabled.
•Delete: This option may be used when selecting one or multiple tasks and/or resources. When selected it will remove the Message Content within the designated table. The Message Origin will then look at the next table in the hierarchy.
•Activate: This option may be used when selecting one or multiple tasks and/or resources. When selected it will move the messages to Active within the corresponding table.
•Inactivate: This option may be used when selecting one or multiple tasks and/or resources. When selected it will move the message to Inactive within the corresponding table.