|
<< Click to Display Table of Contents >> Physician Documentation Scripting |
  
|
|
<< Click to Display Table of Contents >> Physician Documentation Scripting |
|
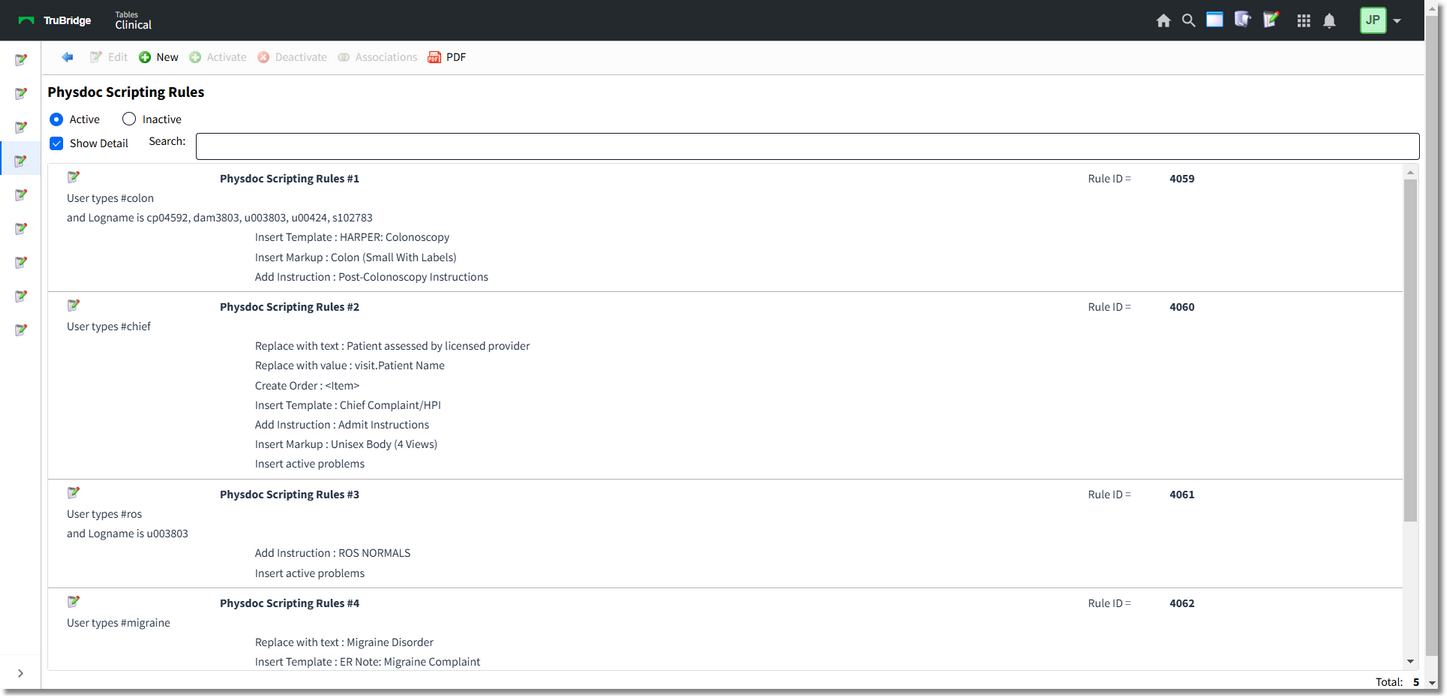
Physician Documentation Scripting allows the provider to type in a macro and have information automatically pull. Based on the setup in this table will determine what pulls to the note. An unlimited number of macros can be created.
Select Web Client > Tables > Clinical > Physician Application > Physician Documentation Scripting
Rules
Once the Rules screen is open, a list of all current Macros will appear. To edit an existing Macro, highlight the rule and select Edit, or simply double-click the rule. To create a new Macro, select New.
Select Web Client > Tables > Clinical > Physician Application > Physician Documentation Scripting > New
Rules
Select OK to save changes. Select New to create a new script. Select Deactivate to remove the script. Once deactivated, the rule can be found on the Rules page by selecting the Inactive radio button.
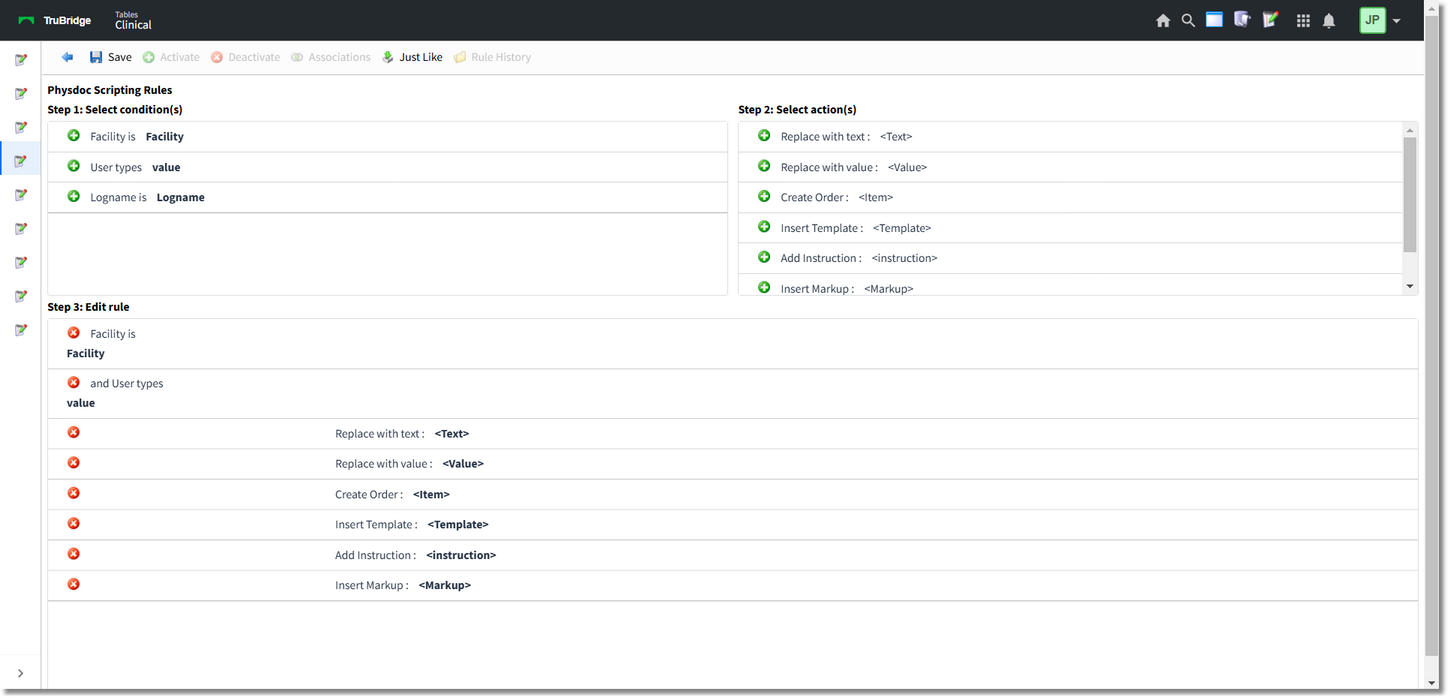
Step 1: Select conditions(s)
•User types value: Select this option to assign a script/macro that the provider will type to have the set up of this table pull.
•Logname is User: Select this option to assign a script to a specific UBL.
•Facility is Facility: Select this option if the facility has multiple companies and this script should apply to certain companies.
NOTE: If a user or company is not specified, the script will apply to all users and all companies.
Step 2: Select action(s)
Select the  green circle icon next to each option to select that item.
•Replace with text Text: Select this option to enter a free-text sentence.
•Replace with value DataValue: Select this option to select a database code. This allows information from the patient's visit to pull to the script.
•Create Order Item: Select this option to pull order(s) to the script.
•Insert template Template: Select this option to pull a template to the script.
•Insert instruction Instruction: Select this option to pull an instruction to the script.
•Insert markup Markup: Select this option to pull a markup to the script.
•Insert active problems: Select this option to pull the problem list to the script.
Select the  green plus sign next to each option to add additional items.
Step 3: Edit the rule description
NOTE: The order that the options in Step 2 are selected will determine the order the options pull to Step 3 and to the note.
•User types value: Select value to enter in the macro used for this script. This macro must begin with a # (pound sign) and not have any spaces.
•and logname is User: Select User to enter the UBL for this script.
•Save: Select this option to save any changes.
•New Value: Select this option to add a UBL.
Select OK to save the information.
•and facility is Facility: Select Facility if the facility has multiple companies and this script should apply to certain companies.
•Save: Select this option to save any changes.
•New Value: Select this option to add a facility.
•Replace with text Text: Select Text to enter a free-text field.
•Replace with value DataValue: Select DataValue to select a database code. This allows information from the patient's visit to pull to the script.
•Key Type: Select Visit from the drop-down.
•Category: Select Demographics from the drop-down.
Select the desired data value and then select Save. Select Cancel to exit the table without saving.
•Create Order Item: Select Item to select an order to pull to the script.
•Department: Select the desired department from the drop-down.
•Search: Enter in the description of the item. This field is a smart search and will begin populating results as text is entered.
Select the checkbox of the desired item. Then select Insert to save this order. Select Cancel to exit the table without saving.
•Insert template Template: Select Template to select a template to pull to the script.
•Template: Select the desired template from the drop-down.
Select Save to save the information.
•Insert instruction Instruction: Select Instruction to select or create an instruction to pull to the script.
Select the checkbox of the desired Instruction or select Create New Instruction to enter a new instruction into the table.
Select Insert to insert this instruction into the script or select the Blue Back Arrow to exit the table without saving.
•Insert markup Markup: Select Markup to select a markup to pull to the script.
Select the checkbox beside the desired markup.
Select Insert to insert this markup into the script or select Blue Back Arrow to exit the table without saving.
•Insert active problems: This option will pull the Physician Problem List entries to the script (documentation).
Once the Save option has been selected, the user will be asked to give the macro a title. This title will display in an alphabetical listing on the Rules page.