|
<< Click to Display Table of Contents >> Add a Free Text Allergy |
  
|
|
<< Click to Display Table of Contents >> Add a Free Text Allergy |
  
|
If the patient has an allergy that cannot be located in the search, a free text allergy can be entered.
1.To enter a free text allergy, select Add Other.

Add Other - Free Text Allergy
2.A message displays alerting the user that clinical monitoring is unavailable for free text entries. Select Yes to continue.

Free Text Allergy Message
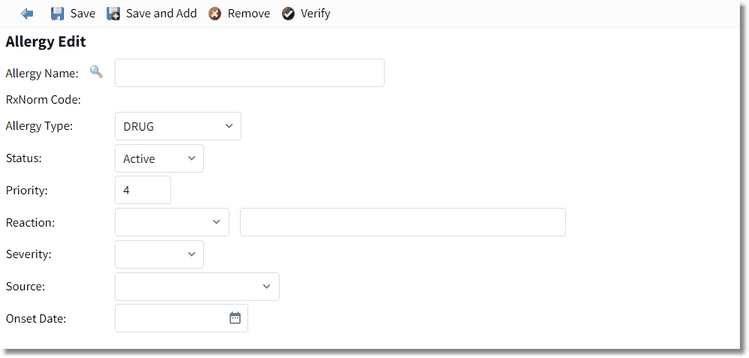
3.The Allergy Edit screen displays.

Allergy Edit
4.Make the necessary updates to the allergy information.
•In the Allergy Name field, enter the allergy description.
•In the Allergy Type field, use the drop-down to select the allergy type from the list.
•The Status field defaults to Active. Use the drop-down to change the status of the allergy, if necessary.
•The Priority field allows the user to define the priority of the allergy when there are multiple allergies documented. If the patient has more than one allergy documented, this field will indicate the order in which the allergy will display on the patient's allergy list. The default priority will always be the order in which the allergy was added. To change the priority, edit the number in this field.
•In the Reaction field, use the drop-down and select a reaction from the list. Repeat to add additional reactions. The selected reactions display in the text box to the right of the Reaction drop-down field. To enter a free text reaction, type the reaction in the text box to the right of the Reaction drop-down field. To remove a reaction, highlight the text and press Delete on your keyboard.
•In the Severity field, use the drop-down and select the severity of the patient's reaction.
•In the Source field, use the drop-down to select the source of the allergy information.
•In the Onset Date field, enter the onset date of the allergy.The date can be selected from the calendar or entered manually in the mmddyyyy format.
5.Select Save to save the allergy information or Save and Add to save the allergy information and add another allergy.
NOTE: Non-coded allergies will display on the patient's allergy list highlighted in yellow and "NC (Non-Coded Allergy)" will display in the Alerts column.