|
<< Click to Display Table of Contents >> Add an Allergy |
  
|
|
<< Click to Display Table of Contents >> Add an Allergy |
|
1.To add an allergy, select Add.
![]()
Action Bar - Add
2.In the Search by Allergy Description box, begin typing the allergy description. The search will display a list of possible matches from Micromedex®. Continue typing to narrow down the list.
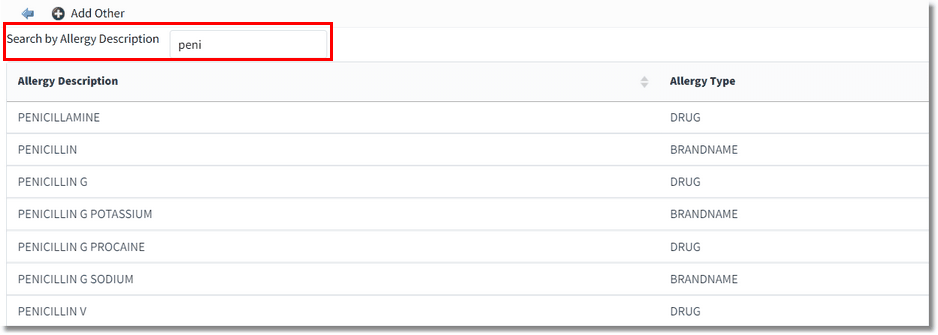
Allergy Search
3.When you locate the desired allergen description, double-click to select it. The Allergy Edit screen displays.
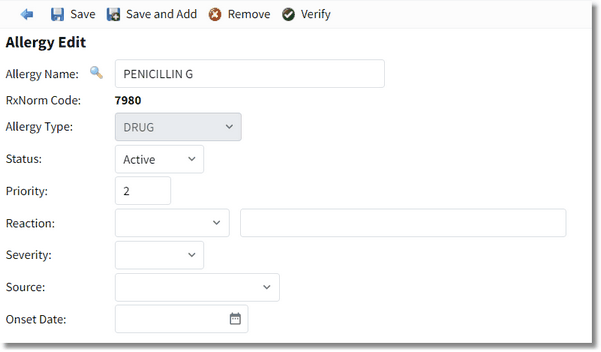
Allergy Edit
4. Make the necessary updates to the allergy information.
•The Allergy Name field displays the allergy description. To change the allergy name, select the magnifying glass and select the correct description.
•The RxNorm Code field displays the RxNorm Code when the allergy description is a medication.
•The Allergy Type field displays the allergy type associated with the allergy description from Micromedex®.
•The Status field defaults to Active. Use the drop-down to change the status of the allergy.
•The Priority field allows the user to define the priority of an allergy when there are multiple allergies documented. If the patient has more than one allergy documented, this field will indicate the order in which the allergy will display on the patient's allergy list. The default priority will always be the order in which each allergy was added. The priority can be changed by editing the number in the Priority field.
•In the Reaction field, use the drop-down and select a reaction from the list. Repeat to add additional reactions. Reactions display in the text box to the right of the Reaction drop-down field. To enter a free text reaction, type the reaction in the text box to the right of the Reaction drop-down field. To remove a reaction, highlight the text and press Delete on your keyboard. NOTE: The Reaction drop-down list displays the entries in Tables > Clinical > Nursing > Allergy Reactions.
•In the Severity field, use the drop-down to select the severity of the patient's reaction.
•In the Source field, use the drop-down to select the source of the allergy information. NOTE: The Source drop-down list displays the entries in Tables > Clinical > Physician Application > Problem List Source.
•In the Onset Date field, enter the onset date of the allergy.The date can be selected from the calendar or entered manually in the mmddyyyy format.
5.Select Save to save the allergy information or Save and Add to save the allergy information and add another allergy.
NOTE: An allergy can be be verified during the entry process by selecting Verify in the action bar.