|
<< Click to Display Table of Contents >> Chart Communication |
  
|
|
<< Click to Display Table of Contents >> Chart Communication |
|
The Chart Communication option is used to create and track requests, refill requests, and messages.
From the Communication Selection screen (Charts > Select Patient > Communication), select Chart Communication. A list of all incomplete requests and messages will display.
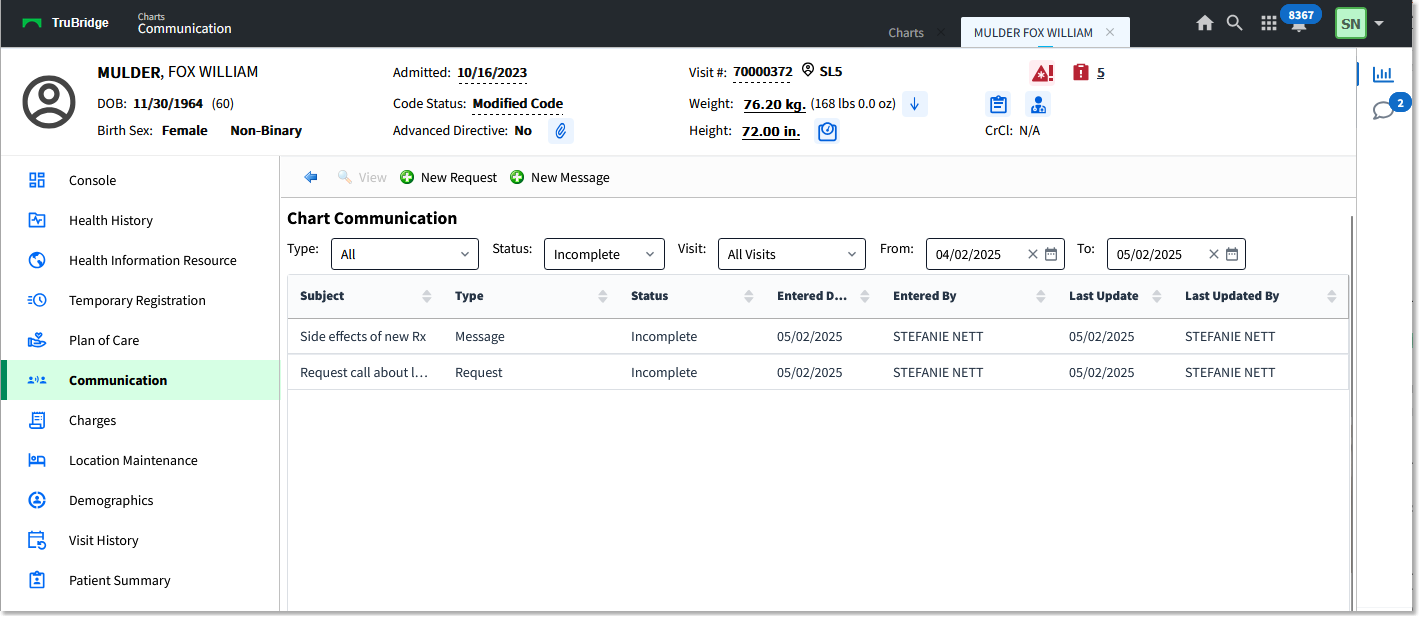
Chart Communication
New requests can also be accessed from the Call Back option on the patient's Clinic Visit screen. The Note option is available on results within Clinical History, Order Chronology, and Lab Results or from the results within the Home Screen alerts. This Note option allows a new message to be created.
NOTE: Within the Documentation application, a message can be set up to reflex when a user selects a question or answer. The corresponding action(s) will be added to Pending for the message associated with the selection. Once the document is updated, the Pending screen will launch. Please refer to the Documentation Setup User Guide for more information.
To view the details of a request or message within the Chart Communication list, select the item and select View. Select the blue back arrow to close the request or message and return to the list.
Use the options at the top of the Chart Communication list to filter the list in any of the following ways.
•Type: Choose Request, Message, Refill Request, or All. By default, All is selected, meaning the list displays all chart communication types.
•Status: Choose Incomplete (the default option), Complete, Removed, or All.
•Visit: Choose one of the following:
oAll Visits (default option): Displays communications related to all visits on active and history accounts for the selected profile.
oCurrent Visit: Displays only communications that were created on the currently selected account.
oLast 3 Visits: Displays only communications that were created on the last three non-history accounts on the profile.
oLast 5 Visits: Displays only communications that were created on the last five non-history accounts on the profile.
oLast 10 Visits: Displays only communications that were created on the last ten non-history accounts on the profile.
oHistory: Displays only communications related to history accounts on the profile.
•From and To: Enter a start and end date (or choose dates using the date picker icons) to filter the chart communications by that date range. Initially, the list is filtered to show communications for the past month. If you choose a different date range, the From date is "sticky," meaning the selected date will remain selected until you select a different date.
1.From the action bar on the Chart Communication screen, select New Request. The Message Detail screen is displayed.
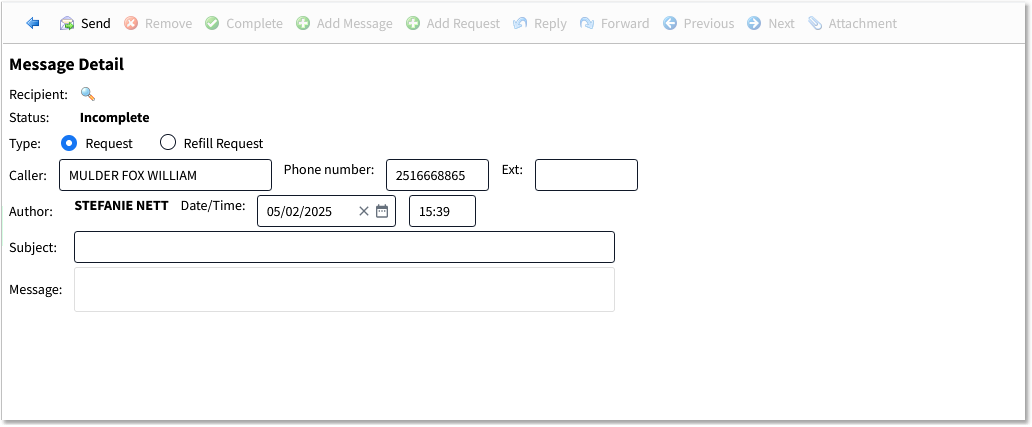
Message Detail - New Request
2.Follow the steps below to choose the user(s) who should receive the message.
A.In the Recipient field, select the magnifying glass icon. The Communication Destination screen is displayed.
B.Choose how to search for the recipient:
•Destinations associated with patient: Lists the users associated with the current patient visit.
•All departments: Provides a lookup of all facility departments and sends the communication to every user with that department assigned to their User Based Login.
•All users: Provides a lookup of all available user logins.
C.If necessary, use the Search field to narrow the list and locate the recipient.
D.Select the appropriate recipient; then select OK. You will return to the Message Detail screen, and the selected name or department will appear in the Recipient field.
NOTE: Each user with a department assigned to their login will have a Department Notification folder created on the Home Screen with a Task Type of VIewChartCommunication and Subscription Type of DepartmentAccess for Department Communications. Department Communications do not go to the Personal Inbox.
3.The Status field defaults to Incomplete and cannot be edited.
4.In the Type field, select the type of communication you want to create: Request, Refill Request, or Message.
5.The Caller field auto-populates with the name from the selected visit, and the Phone number and Ext fields auto-populate with the phone number associated with the patient profile. On Requests and Refill Requests, these fields are editable. On Messages, they are read only.
6.The Author field auto-populates with the user name of the logged-in user, and is not editable.
7.The Date/Time displays the date and time the communication is created. This can be edited only during the original entry.
8.In the Subject field, type the subject of the communication. This can be edited only during the original entry. If no subject is entered, "No Subject" will display.
9.In the Message box, type the message contents.
10.Select Send to send the Request or Message. A notification is created for the recipient as an Alert on the Home Screen. If no recipient was selected, the notification will be sent to the author of the Request or Message.
After a Request or Message is sent, the following options are available on the action bar.
•Remove: Allows a message/request or series of messages/requests to be be flagged as inactive. This will remove the communication from the Home Screen alerts for all recipients. This is a toggle switch, so once a message is removed and saved, the option changes to Make Active. Either of these actions creates a new request or message entry for documentation.
•Complete: Allows a message/request or series of messages/requests to be documented as complete. This is a toggle switch, so once a message is completed and saved, the option changes to Incomplete. Either of these actions creates a new request or message entry for documentation.
•Add Request: Allows a request to be added to a previously saved request. A Recipient needs to be selected. The Caller will pull the caller from the series. The Author will populate with the current user name. The date and time will default to the current date and time but may be edited. The subject will pull from prior request but is editable until saved. The request will be blank for entry. Once saved, the previous request will be removed from Home Screen alerts for all recipients.
•Reply: Allows a response to be added to a message or request. The Recipient will be the prior Author. The Type, Caller, and Phone number will pull when the communication is a Request. The Author will populate with the current user name. The date and time will default to the current date and time but may be edited. The Subject will pull from the previous entry and is editable. The new message may be entered above the previous messages in the communication. Once saved, the previous request will be removed from home screen alerts for all recipients.
•Forward: Allows a message or request to be sent to another recipient. A Recipient needs to be selected. The Type, Caller, and Phone number will pull when the communication is a Request. The Author will populate with the current user name. The date and time will default to the current date and time but may be edited. The Subject will pull from prior message but is editable until saved. The new message may be entered above the previous messages in the communication. Once saved, the previous request will be removed from home screen alerts for all recipients.
•Previous: Displays the prior message or request in the series. If on the first message or request, the option is not active.
•Next: Displays the next message or request in the series. If on the last message or request, the option is not active.
•Attachment: When there is an attachment on the communication, this option is active and will display the attachment when selected.
To add another message or request to an existing one, select the item from the Chart Communication screen and select Add To Request from the action bar. Then complete the Message Detail screen as described above.
The Add to Request button is available on the action bar only when an existing communication is selected (highlighted), and it serves the same function as the Add Request button on the Message Detail screen. It simply allows users to add to an existing communication thread without opening the communication first.
When a thread is created, the number of messages in the thread appears in parentheses to the left of the message subject within the list.
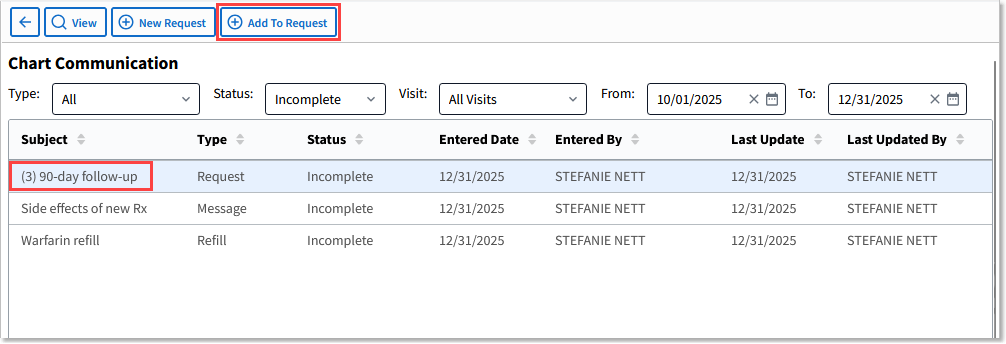
Add to Request Button and Message Count Indicator