|
<< Click to Display Table of Contents >> Radio Button |
  
|
|
<< Click to Display Table of Contents >> Radio Button |
|
Select Web Client > Tables > Clinical > Physician Application > Physician Documentation Templates > New > enter title of template > Add Control > Radio Button
or
Select Web Client > Charts > Inpatient Test Account > Documentation > Templates > New > enter title of template > Add Control > Radio Button
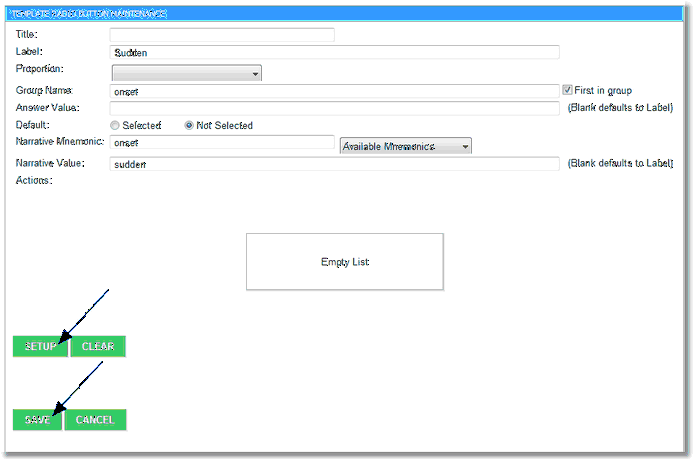
Template Radio Button Maintenance
Radio buttons are utilized when the user will make a single selection from a list or group of options. Ex: Admit/Deny, Positive/Negative, Yes/No, etc.
•Title: Leave this field blank. If information is entered in this field, it will be viewable in the Narrative Available Mnemonics Control window only.
•Label: Enter the title of the radio button. Information entered here will display on the template view.
•Proportion: This allows information to be evenly spaced in the template.
•Group Name: Each group of radio buttons must have a group name. Enter the user-defined group name.
•First in group: Select this field for the first radio button of the collection only.
•Answer Value: Leave this field blank.
•Default:
▪Selected: Select this option if this radio button should default to being selected.
▪Not Selected: Select this option if this radio button should default to not being selected.
•Narrative Mnemonic: Enter the user-defined mnemonic. This mnemonic allows information to pull to the note. Spaces and special characters should not be included.
•Available Mnemonics: Select the drop-down menu to select an existing mnemonic. This option would be used when creating a group.
•Narrative Value: Enter the information that should pull to the note if this radio button is selected. Otherwise, leave this field blank, and the information in the Label field will pull to the note.
•Actions: Displays orders or templates that are associated with this radio button.
▪Setup: Select this option to set up orders or templates for this radio button.
▪Clear: This option is for future use.
Select Save to save the information.
Select Cancel to exit the table without saving.
Select Web Client > Tables > Clinical > Physician Application > Physician Documentation Templates > New > enter title of template > Add Control > Radio Button > Setup
or
Select Web Client > Charts > Inpatient Test Account > Documentation > Templates > New > enter title of template > Add Control > Radio Button > Setup
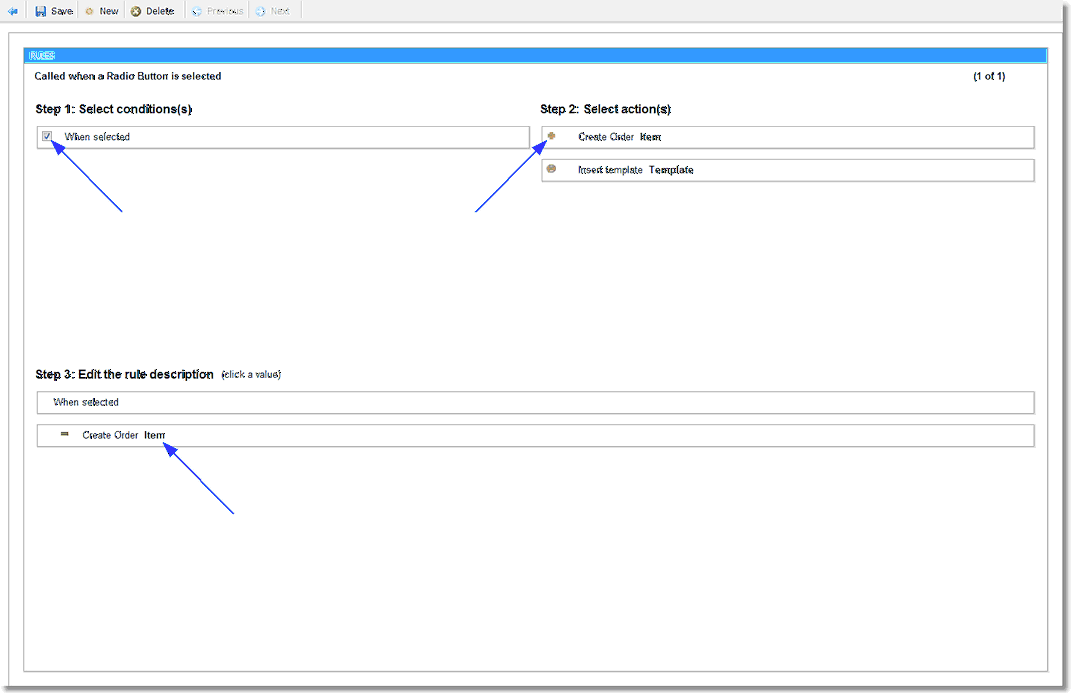
Radio Button - Rule Builder
Select OK to save changes. Select New to create a new action. Select Delete to delete the action.
Step 1: Select conditions(s)
•When Selected: Select this option to have the sub template or order pull when the radio button is selected.
Step 2: Select action(s)
Select the  green circle icon next to each option to select that item.
•Insert Order Item: Select this option to pull order(s) in the template.
•Insert template Template: Select this option to have a template pull within the main template.
Select the  green plus sign next to each option to add additional items.
Step 3: Edit the rule description
•When selected
•Create Order Item: Select Item.
Select Web Client > Tables > Clinical > Physician Application > Physician Documentation Templates > New > enter title of template > Add Control > Radio Button > Setup > Item
or
Select Web Client > Charts > Inpatient Test Account > Documentation > Templates > New > enter title of template > Add Control > Radio Button > Setup > Item
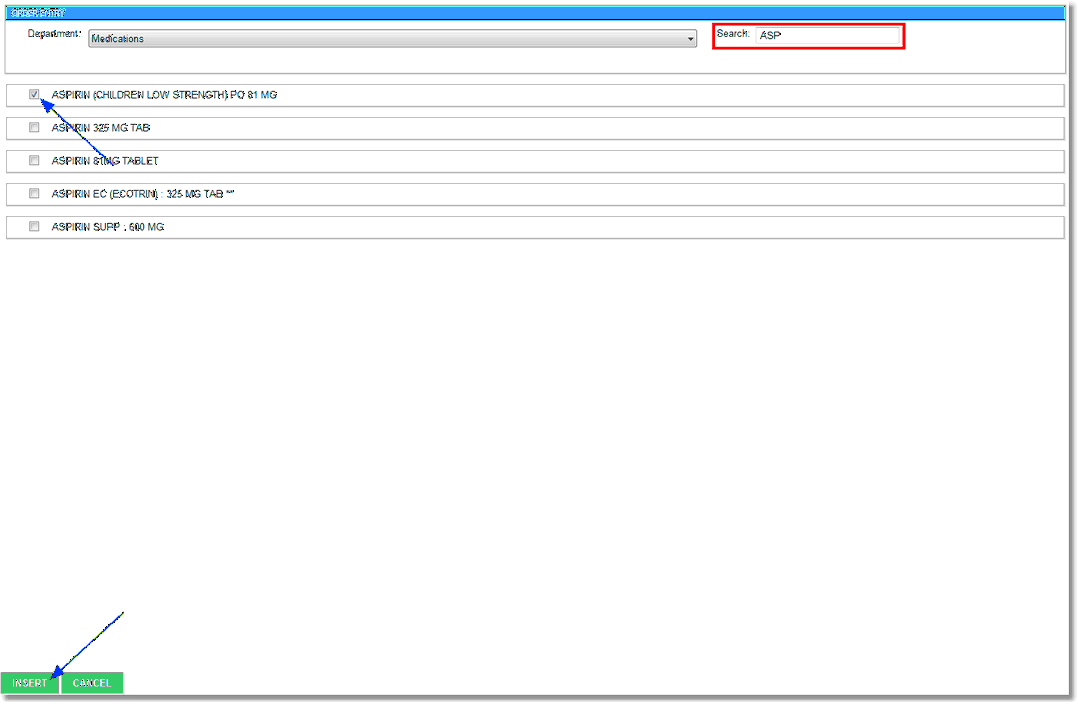
Radio Button - Order Entry
•Department: Select the desired department from the drop-down.
•Search: Enter in the first few letters of the item.
Select the checkbox of the desired order. Select Insert to attach the order to the radio button and include the order in the template. Select Cancel to exit the table without saving.
•Insert template Template: Select Template.
Select Web Client > Tables > Clinical > Physician Application > Physician Documentation Templates > New > enter title of template > Add Control > Radio Button > Setup > Template
or
Select Web Client > Charts > Inpatient Test Account > Documentation > Templates > New > enter title of template > Add Control > Radio Button > Setup > Template
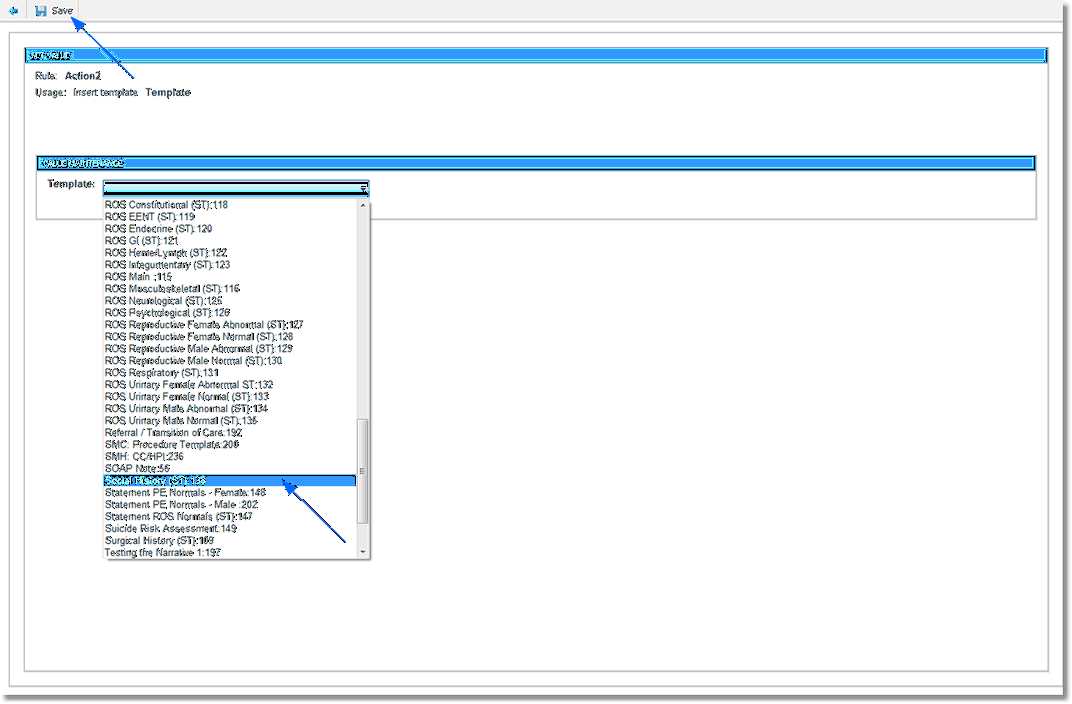
Radio Button - Set Value
Select the title of the desired template. Select Save to attach the template to the radio button and include the template in the main template. Select Cancel to exit the table without saving any changes.