|
<< Click to Display Table of Contents >> Scheduled Appointments Tab |
  
|
|
<< Click to Display Table of Contents >> Scheduled Appointments Tab |
|
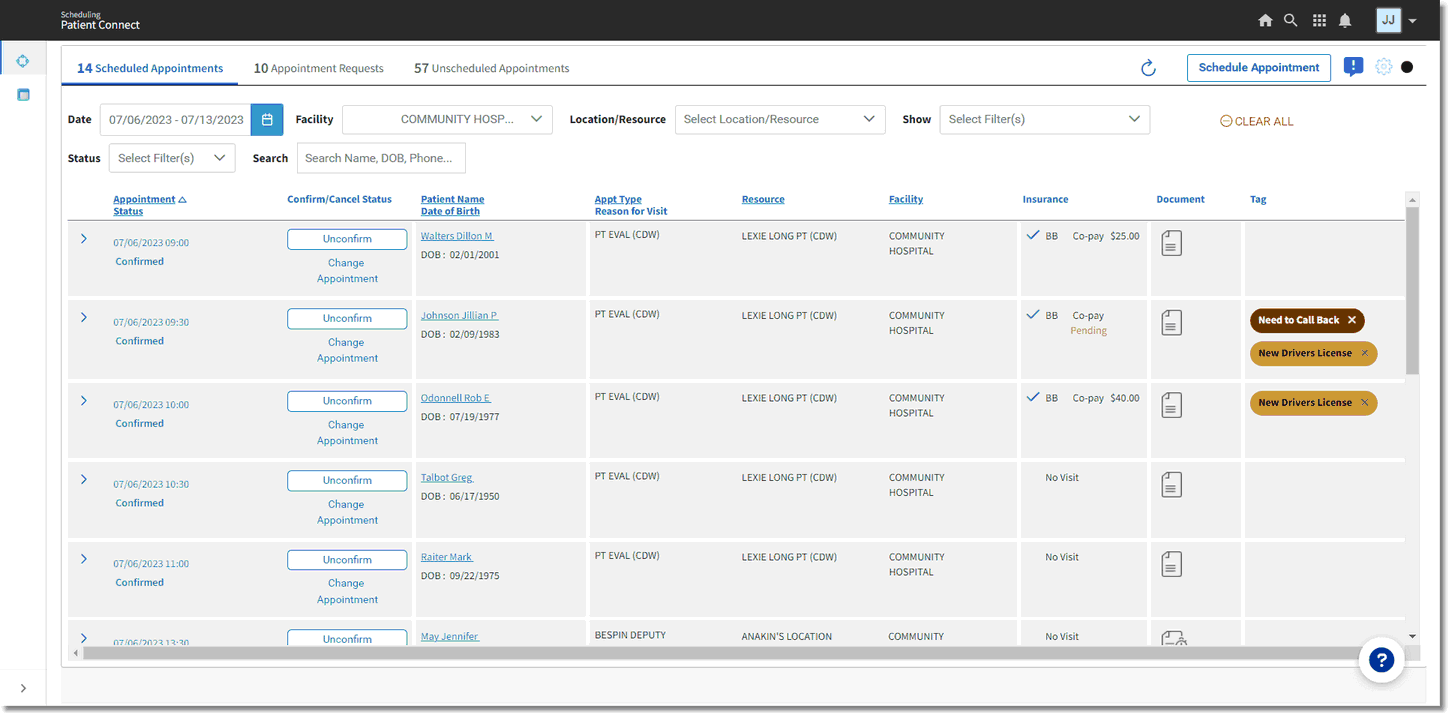
The Scheduled Appointments tab will display a listing of all current and future scheduled appointments and may display historical appointments if needing to follow-up on specific appointments. This screen will allow appointments to be filtered by date, facility, location/resource, and by appointment status. Information for facilities will only be seen by users having access to those facilities. The Location/Resource and the Appointment Type will only filter those associated to the selected facility. A search option is also available to search for an appointment by name, date of birth, phone number and visit number. To quickly clear any filtering that has been selected, select ![]() Clear All.
Clear All.
NOTE: The Clear All option will only appear when there is filtering to be cleared.
Date Filter for Historical Appointments
To view historical appointments for a specific date, select the Date field, select Specific Day and then select the desired date.
To view historical appointments for a specific date range, select Date Range and then select the desired beginning and end dates. When using the Date Range option, Patient Connect will only allow appointments in the previous 90 days to be searched. In addition, a maximum date range of 14 days may be selected.
Scheduled Appointments
The columns on Scheduled Appointments tab will display the following:
•Appointment Status:This column will display the current status of the appointment along with the date and time of the appointment.
▪Prior to the patient coming in for their appointment, this column will display one of the following: Scheduled, Confirmed, Pending Confirmation, Request to Reschedule or Request to Cancel.
oHovering over the words Confirmed, Request to Reschedule or Request to Cancel on the appointment will display the date and time in which the patient responded to the Appointment Confirmation message.
oIf the appointment was manually confirmed from the tracking board, hovering over Confirmed will display "Manual Confirmation".
oRefer to the Confirming Appointments and Canceling Appointments section of this document for more information.
▪"Booked" will appear next to the appointment date and time once it has been scheduled. On the day of the appointment, "Booked" will become selectable. After the patient arrives, cancels, or does not show for their appointment, select Booked to update the appointment status to Check-In, Complete, Cancel, or No Show.
▪The Show drop-down may be used to filter this column by Cancel/Reschedule Requests, Confirmed Appointments, and/or Unconfirmed Appointments
•Confirm/Cancel Status: Appointments may be manually Confirmed or Unconfirmed, if needed, from this column. Selecting Change Appointment is where the appointment may be rescheduled or canceled if needed.
•Patient Name/Date of Birth: The name and date of birth of the patient as it appears on the patient's profile. If a visit has been linked to the appointment, the visit number will also display in this column.
NOTE: A patient's preferred name may display in parentheses after the legal name.
This information pulls from Web Client > System Menu > Profile Listing > Select Profile > Misc Options > Additional Demographics. The preferred name will display if the patient's Last, First and Middle name are populated under Person's Alternate Name/Address and has selected Call Me as the Name Qualifier.
•Appt Type/Reason for Visit: The selected Appointment Type the patient is scheduled for as well as the reason for the patient's visit.
•Resource: The personnel/location of where the appointment is scheduled for.
•Facility: The facility of where the appointment will take place.
•Form: Registration information may be reviewed and requested directly from this column such as a drivers license, insurance information, consent forms etc., prior to the patient coming into the facility. This may be done for historical, current and, future appointments. Refer to the Form Request section of this document for more information.
•Tag: Tags may be manually added on any of the appointment tabs to allow appointments to be searched and sorted as needed.
▪The tag description may be entered in the Search field at the top of the screen to filter the screen to that specific tag.
▪Selecting the name of the tag from this column will also filter the screen to a specific tag.
▪Tags applied to an appointment will carry forward as the patient moves through the various stages from an appointment request to scheduling.
▪To add a tag:
oSelect anywhere in the Tag column next to the appointment needing a tag.
oBegin typing in the desired tag.
oAs typing begins, a list of previously used tags will display and may be selected.
oIf the desired tag has not been used before, continue typing and then select the Enter key to add the tag to the appointment.
▪Once a tag is added, additional tags may be added.
▪Tags will remain on the appointment line until it is manually removed.
▪Tags that are no longer applicable must be manually removed from the appointment by selecting the X next to the tag needing to be removed.